How to Cook a Tomahawk Steak: Reverse Sear, Grill, and More

Hi — I’m Chef Marcus, and yes, that’s a whole tomahawk steak you just bought.
Maybe it was on sale. Maybe it was a birthday. Maybe you just saw that hunk of meat with the Flintstone bone sticking out and thought, Why not?
Whatever brought it home, here you are. Holding a steak the size of a newborn, wondering how to cook it without ruining it. Because let’s be honest — it wasn’t cheap, it’s too big to mess up casually, and you don’t want to pretend you meant for it to come out gray in the middle with a burnt crust.
The good news? It’s not hard. It just demands attention — not fancy techniques or obscure gear, just a basic understanding of what you’re dealing with. A tomahawk isn’t a normal steak. It’s thick, it’s dramatic, and it cooks differently. Treat it like a grocery-store ribeye and you’ll end up with raw or rubbery. But give it the right time, the right heat, the right rest, and it becomes one of those things people don’t forget.
So if you’ve got the steak, the salt, and a little patience — I’ll show you exactly how to make it count.
Foreword: The First Time I Cooked One
The first time I cooked a tomahawk steak, it wasn’t for me. It was for a client — one of those backyard dinners where the grill costs more than the fridge inside. They handed me the steak like it was a newborn and said, “Just don’t mess it up.”
It was massive. Bone like a baseball bat. Two inches thick. Still cold in the center because it had been sitting on the counter for five minutes, which they thought was “letting it come to room temp.” No plan, no thermometer, just a general sense that it should be seared “until it looks good” and then “finished somehow.” You know — the usual approach when you’re holding sixty dollars’ worth of beef and guessing.
I’ve cooked plenty of ribeyes. Plenty of thick steaks. But the tomahawk’s a different beast. It’s got theater. It’s got weight. And it punishes carelessness faster than you’d expect. You can’t just toss it on high heat and hope the middle gets there before the outside turns into bark. You’ve got to think in stages. You’ve got to pace it. And if you want that crust without wrecking the rest, you’ve got to know when to stop.
That night, I did the whole thing low and slow — reverse sear on a two-zone grill. I watched the temp rise like it was a soufflé. Pulled it early. Let it rest longer than anyone wanted to wait. Then seared it hard at the end, just enough to get that color and crunch. When I sliced it open, it was perfect edge-to-edge. Deep pink, hot all the way through, crust like a good memory.
Client said, “This is the best steak I’ve ever had,” which, sure — maybe they say that to everyone. But they also asked me how to do it. And that’s how you know it actually worked.
So if you’ve got a tomahawk steak in front of you, and you want it to live up to what it looks like — not just survive the grill, but land on the board like you meant it — keep reading.
Let’s walk through how to cook this thing right, from raw to rested to sliced and served.
What Is a Tomahawk Steak (and Why It’s Not Just a Ribeye with a Handle)
If you’ve never cooked one before, the tomahawk steak looks more like a prop than a meal. It’s long. It’s heavy. It’s got a bone that could double as a weapon. It feels like something a cartoon caveman would drag into a feast. But underneath all the theatrics, what you’re holding is a ribeye — just a very specific one.
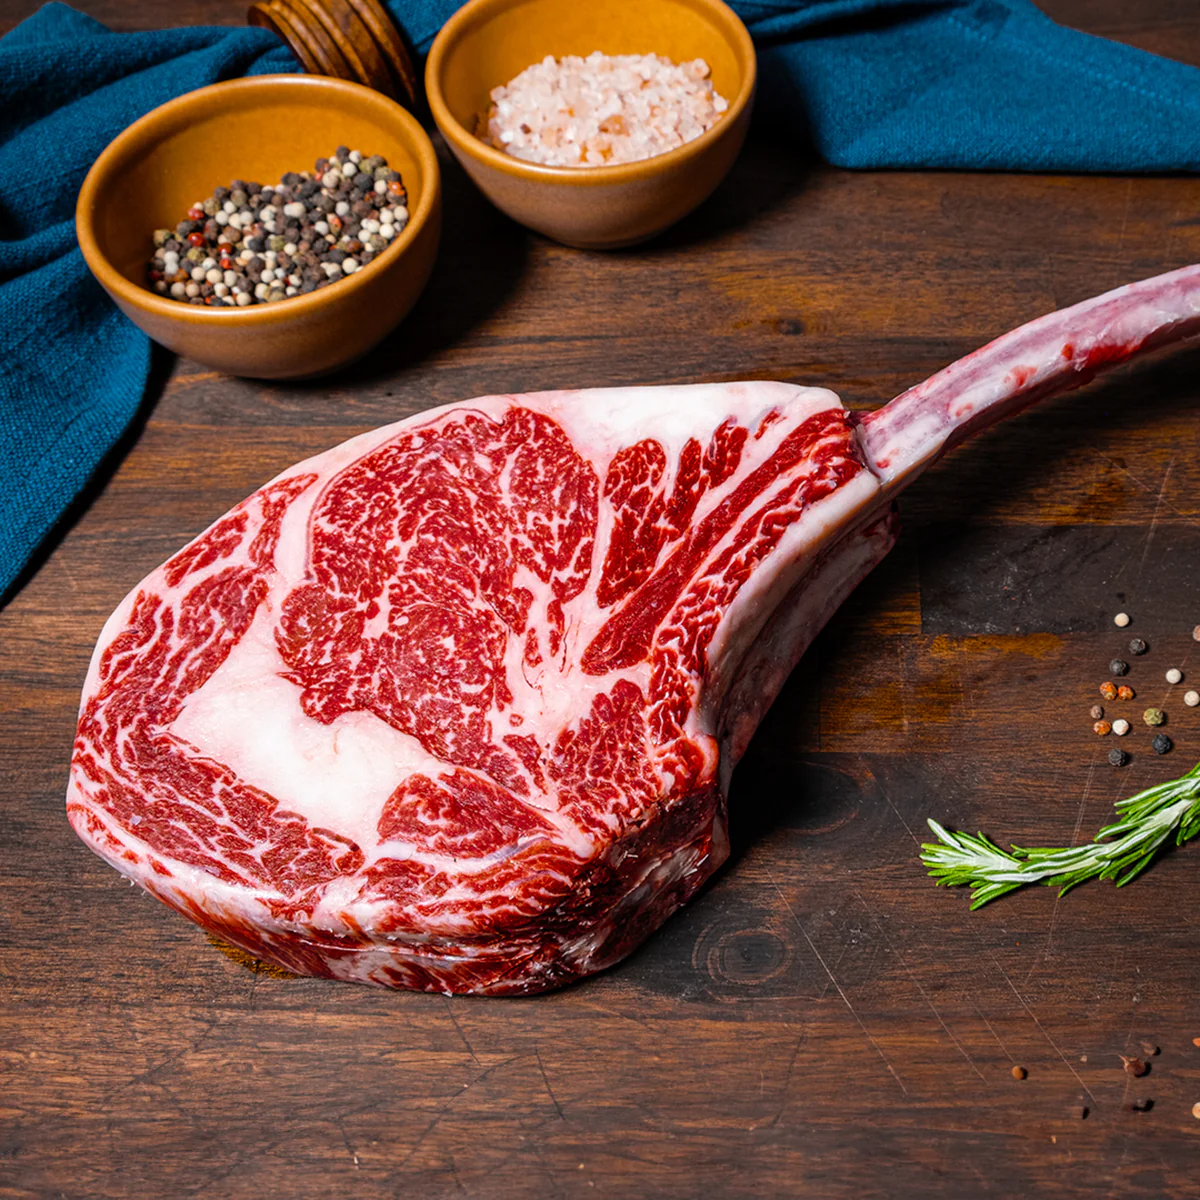
The tomahawk is a bone-in ribeye, cut from the rib primal — the same area that gives you your standard ribeyes, prime rib roasts, and cowboy steaks. What sets it apart is the length of the rib bone, which is left fully intact, cleaned of meat and fat (“frenched”), and usually measures around 6–8 inches long. It’s mostly presentation — the bone doesn’t do much for the flavor — but it does change how the steak cooks.
That long bone acts like a heat sink. It draws energy away from the center of the meat during cooking. That means it takes longer for the middle to come up to temp, and it’s easier to overcook the outer layers while waiting for the inside to catch up. A thick boneless ribeye will cook faster and more evenly — but it won’t make anyone stare when you bring it to the table.
Most tomahawks weigh between 30 and 45 ounces. That’s close to two and a half pounds, sometimes more. Thickness matters here. You’re usually dealing with a steak at least two inches thick — sometimes closer to three. That’s not the kind of thing you sear and serve. It’s more like cooking a roast with a built-in crust.
The quality of the meat matters even more at this size. A well-marbled tomahawk — whether it’s USDA Prime, wagyu crossbreed, or a high-choice grain-finished cut — will stay juicier, handle the slow cooking better, and taste more forgiving even if you overshoot your target temp by a few degrees. Grass-fed versions tend to run leaner, which makes them more prone to drying out unless you’re extra careful with your heat.
And while we’re clearing up confusion: no, a tomahawk steak isn’t the same thing as a cowboy steak. The cowboy is basically the same cut — a bone-in ribeye — but with a shorter bone. No handle, no drama. Easier to fit in a pan, harder to show off on Instagram.
So what are you really cooking?
A thick, bone-in, heavily marbled steak that demands low, steady heat to come up gently to medium-rare, followed by high, fast heat to give it the bark it deserves. It’s not hard. But it is different. And if you treat it like something special — because it is — it’ll pay you back for the effort.
Planning Ahead — What You Need to Know Before You Touch the Grill
You don’t start a tomahawk steak the way you start a regular one. You don’t pull it out of the fridge, salt it, and toss it on a hot pan. That works with a thinner cut. It fails hard with a two-inch steak attached to a rib. This cut requires pacing. And most of that pacing happens before the first lick of heat.
First thing: let the steak come close to room temperature. Not warm. Just not fridge-cold. If the center is still icy when it hits the grill, the outside will overcook before the inside even moves. Pull it out at least an hour ahead. Let it sit, uncovered or loosely tented, so the surface dries a little. That dry surface is what gives you browning later. A wet steak steams. A dry steak crusts.
Next up: salt. And here’s where people overthink it. You don’t need a rub, a marinade, or a secret steak blend. You need kosher salt — enough to coat the whole surface generously. If you want to add pepper, do it later, right before searing. Pepper burns, and if you’re using high heat at the end, it can go bitter. If you like other spices, that’s fine — but none of them matter if you don’t get the salt right first.
A tomahawk benefits from being salted early — ideally an hour before cooking. That gives the salt time to pull moisture out, dissolve, and then get reabsorbed. It’s not a brine. It’s just time. If you forget, fine — salt it before it hits the heat. But if you plan ahead, you’ll get a better crust and deeper seasoning.
You also need to think about your cooking setup. This is not a cut you rush. You want either two heat zones on a grill (one side hot, one cooler), or a two-step setup indoors: oven to bring the steak to temp, cast iron to sear it off. If you have a meat thermometer — and you should — this is the time to check the batteries. You’re not aiming for a guess. You’re aiming for a number.
And while we’re on gear: you don’t need a special steak pan, but you do need something that holds heat. Cast iron is ideal. Heavy stainless can work. Thin nonstick? Not for this job. You want a surface that can sear, not just sizzle.
Finally — know your target. If you like medium-rare, you’re aiming to pull the steak from indirect heat at around 115–120°F (46–49°C). Then you’ll sear it, and it’ll finish in the 125–130°F (52–54°C) zone. If you wait for it to hit 130 before you sear, it’ll overshoot into medium-well before it even rests.
This is slow, deliberate cooking. But if you set yourself up right — dry steak, good salt, controlled heat, and a plan — everything after that gets easier. You don’t need to babysit. You just need to steer.
How to Cook It — Every Method That Works (and When to Use Them)
Cooking a tomahawk isn’t about speed. It’s about control. You’re managing heat through thick meat and bone — not just searing the outside and hoping the inside plays along. That means your strategy depends on two things: how thick the steak is and how confident you are managing gradual temperature.

There’s more than one right way to cook a tomahawk. But all the good ones follow the same logic: bring the internal temp up slowly, then hit it with high heat to build the crust.
Let’s walk through the methods that do that well.
Reverse Sear (Low and Slow → High and Hot)
This is the most forgiving method — and the one that delivers the most consistent results for thick cuts. You start with indirect heat, either in an oven or on the cool side of a grill, and let the steak come up gradually to just under your target doneness. Then you finish it fast with a hard sear, building that crust without overcooking the center.
If you’re nervous about screwing it up, this is your move.
On a grill: set up two zones — one cooler side for slow cooking, one hot for the final sear. Indoors: oven at 250°F (120°C) until internal temp hits 115–120°F (46–49°C), then sear in a ripping-hot cast iron pan for 45–60 seconds per side. Don’t forget the edges.
Sear First, Finish Slow
This method goes in the opposite direction — you get the sear done up front, then finish the cook gently. The upside: a darker crust. The downside: it’s easier to overshoot the final doneness if you’re not watching the internal temp like a hawk.
Start by searing the steak hard in a pan or over flames, then move it to a cooler zone (or oven) and let it cruise to your target temp. You’ll need a thermometer to get it right — the outside will look done before the inside’s even close.
Best used when you know your timing and heat zones by heart. Not recommended for first-timers.
All-Grill, Two-Zone Fire
If you’ve got a charcoal or gas grill with room to move, you can do the whole thing outside. Bank your coals or burners to one side — hot zone and cool zone. Start the tomahawk on the cool side, lid closed, flipping every ten minutes until it gets within ten degrees of done. Then slide it over the flames and sear it hard, turning often, until the crust builds.
It feels primal. It works. Just watch your flare-ups — that bone loves to catch fire if there’s fat nearby.
Sous Vide + Sear
If precision is your priority and you don’t mind a little prep, this is the cleanest route to a perfect medium-rare all the way through. Vacuum-seal the steak (or use a freezer bag with the air pushed out), cook in a 129°F (54°C) water bath for 2–3 hours, then sear it off hard in a pan or over flames.
You won’t get the same dry, crunchy crust without some extra steps (like a quick chill + dry), but you’ll never overcook it. Great for dinner parties when you want to show off without sweating the timing.
Campfire or Open Flame
It can be done. It can be excellent. But if you’re going this route, know what you’re getting into. You’ll need control — some way to pull the steak away from direct flame and rest it over coals or indirect heat. Otherwise, you’ll end up with a charred outside and a raw core. Think caveman, but with a thermometer.
Great if you’re cooking outdoors and want the drama. Risky if you’re hungry, in a hurry, or short on patience.
Each method has its pros and pitfalls. Choose based on your setup and comfort level. If you’ve never done it before? Go reverse sear. You’ll learn the feel of the steak as it cooks, and you’ll get a crust after the inside is dialed in — which is exactly how it should be.
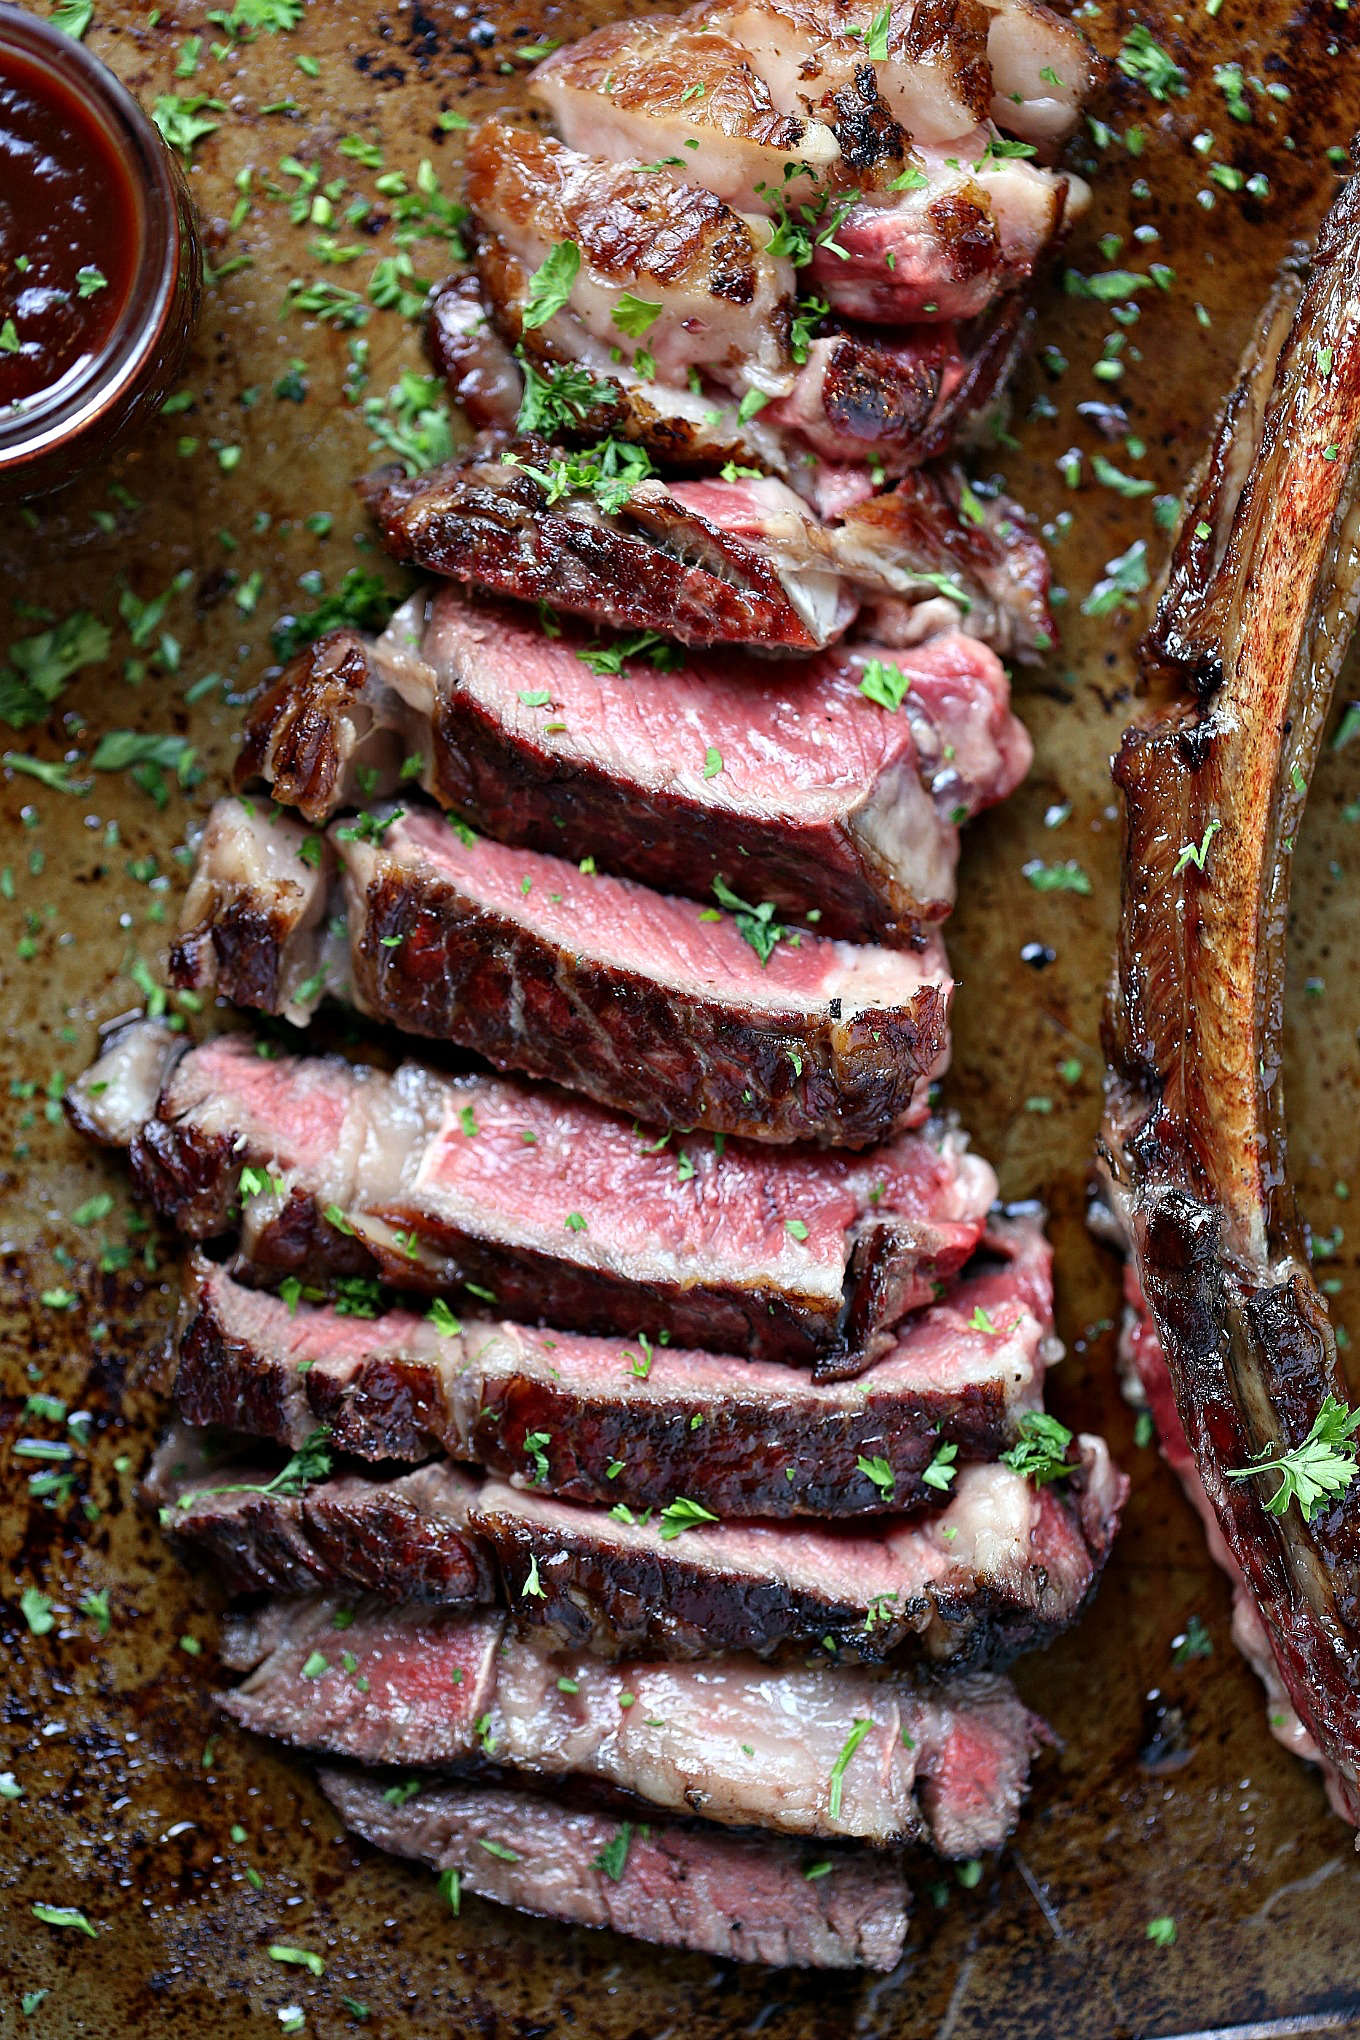
The Sear — How to Get Crust Without Killing the Center
The tomahawk’s big advantage — all that thickness — becomes a liability if you don’t handle the sear carefully. The inside takes its sweet time coming up to temperature, and the outside? It’s ready to burn the minute you crank the heat.
So your goal isn’t just to sear. It’s to finish — to lock in that last layer of flavor without pushing the center out of range.
If you’ve brought the steak up slowly, you’re in good shape. The inside’s hovering just under your final temp. The muscle fibers are relaxed. The juices are where they need to be. Now all you have to do is build a crust — and you’ve got maybe two minutes to do it.
Start with a dry surface. Pat the steak down if it looks glossy. Moisture is the enemy of browning — it cools the surface, creates steam, and robs you of that deep sear you’re after. You want contact. You want heat. You want that unmistakable smell of fat hitting hot metal.
Use cast iron if you’re indoors. Use direct flame or hot grates if you’re outside. And make sure whatever you’re searing on is hot. Not just warm. Not just sizzling. Smoking hot. The kind of heat that scares you a little when you drop the steak down.
From there, it’s about restraint. Don’t flip constantly. Let the crust form before you move it. Give it 45 to 60 seconds, then turn. Hit the other side. Then stand it up and sear the edges, the fat cap, the rib edge — all the weird surfaces that most people forget but make the final bite taste better.
Butter basting? Optional. It adds flavor, sure — especially with garlic and herbs — but it’s more about drama than necessity. If you do it, do it at the very end, after the crust is already formed. Otherwise, you’re cooling the surface too early.
And once the sear’s done — stop. Get it off the heat. Don’t poke it. Don’t cut into it. Don’t toss it on a plate like it’s ready to serve.
The sear finishes the outside. The rest? That’s up next.
The Rest — When, How Long, and Why It’s Everything
You’ve cooked the tomahawk to a perfect medium-rare. You’ve nailed the sear. It smells ridiculous. You want to slice it open right now and show off that pink center and that crust like lacquered bark.
Don’t.
If you cut into it right away, what you’ll actually see is a puddle of juice bleeding out onto the board, a dull gray ring around the edge, and a center that’s still finishing itself while the rest cools down in panic.
Resting is what makes the inside of the steak settle. It’s not about cooling — it’s about redistributing. The heat at the edge keeps moving inward for several minutes after you pull it from the fire. That carryover is what actually brings the center to your final target temperature. And as the muscle fibers relax, the moisture they were squeezing out starts to reabsorb.
Skip the rest, and the steak loses both its heat and its juice. You’ll end up with a crusty shell and a soggy plate.
So how long?
For a tomahawk, ten to fifteen minutes is standard. If it’s thicker than average — say, over 2.5 inches — give it closer to twenty. If it’s smaller, ten is enough. You want it warm when you serve it, not hot like it just left the pan. That’s when it’s most tender, most flavorful, and easiest to slice clean.
You can rest it uncovered on a cutting board, or tent it loosely with foil. If you tent, don’t wrap — too much steam and you’ll soften that crust you just worked for. Let the air circulate. You’re not holding it in a sauna. You’re giving it time to collect itself.
And while it rests? That’s your window. Make your side dish. Pour the drinks. Wipe down the cutting board. Because once it’s ready to slice, it’s go time — and that moment deserves a clean landing.
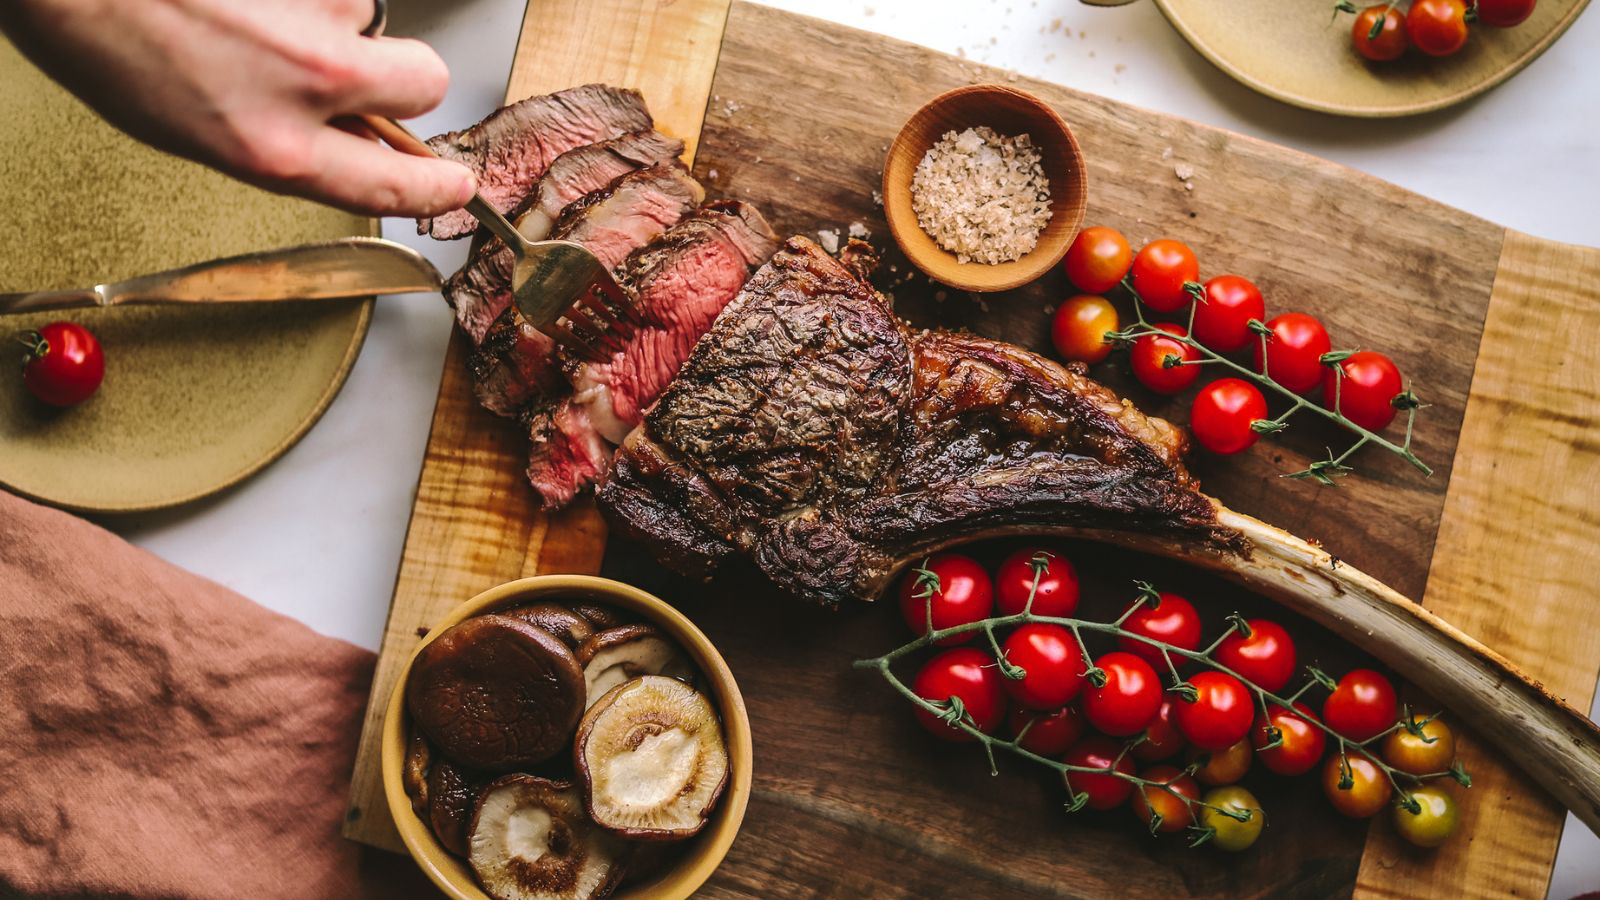
Carving the Beast — Presentation That Doesn’t Butcher the Cut
You’ve rested the steak. It’s done. The crust looks like it came from a steakhouse, the inside is still holding its heat, and now it’s time to carve. This is where people either nail the landing — or hack it up like they’re splitting firewood.
The first thing you want is a sharp knife. Not serrated, not flimsy — something with weight and a clean, honed edge. Dull knives crush meat. They tear fibers, smear juices, and make the steak taste overcooked even when it’s not. If you’ve come this far, don’t carve with a bread knife. Treat the blade like a second sear: crisp, precise, deliberate.
Start by removing the bone. The tomahawk bone is long, curved, and mostly decorative — it doesn’t go through the center of the meat. Stand the steak on its side, anchor the bone with your hand, and slide the knife along the curve of the bone to separate it from the meat in one clean pass. Don’t saw. Just follow the line.
Now lay the boneless ribeye flat and look for the grain — the direction the muscle fibers run. Slice against it. Always. That’s what gives you a tender bite instead of a chewy one. With ribeye, the grain usually runs in a slight diagonal across the width of the steak. Angle your knife accordingly and cut into thick, even slices — somewhere between a half-inch and three-quarters is perfect.
Slice the whole thing, then decide how you want to plate it. You can fan it out on a board with the bone laid back on top for drama, or stack the slices over a pool of board sauce if you’ve made one. Either way, serve it warm, not piping hot — the meat will be more flavorful, the texture more relaxed, and the whole experience smoother.
This is the part where people gather around. They lean in. They ask questions. And when the steak’s done right — pink from edge to edge, crust crackling on the outside, juices held where they belong — you don’t need to say a thing.
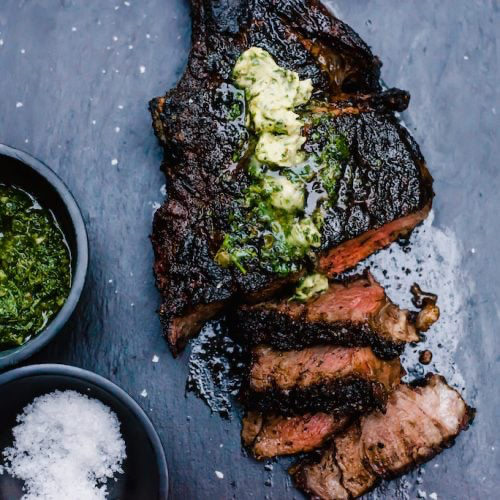
Seasoning, Butter, Rubs, and Marinade Logic
A tomahawk steak doesn’t need help. It’s rich. It’s fatty. It’s already packed with flavor, especially if you’ve cooked it low and slow with a good sear and proper rest. But if you want to layer in more — a little sharpness, some herbal lift, maybe a bit of charred contrast — this is where you do it. Not to fix anything. Just to push it a notch higher.
Let’s start with salt. Hopefully, you already salted the steak before it ever hit the heat. If you didn’t, that’s your first fix. A steak this thick needs seasoning to go deep. Kosher salt, early and generous, is enough for most people. If you want to finish it with flake salt after carving — Maldon, Jacobsen, something crunchy — that’s a nice move. Adds texture and wakes up the crust.
Black pepper? Good, but time it right. Add it after the initial cook, before the sear, or even after slicing. If you hit it with high heat too early, it scorches. That burnt-pepper bitterness is why some people think they don’t like crusted steaks.
Butter is optional — but effective. Not because the steak needs richness, but because it carries flavor. A simple compound butter with garlic, parsley, lemon zest, or even anchovy melts beautifully over hot meat. Just a slice on top after the rest, or stirred into the resting juices if you’re building a pan sauce. Don’t drown the steak — you’re not making toast.
As for rubs, keep them dry. Sugar burns. Paprika can go bitter. Anything that clumps or forms a paste is better suited for a roast or a slower cook with less direct sear. A tomahawk doesn’t need camouflage — just support. Garlic powder, cracked pepper, rosemary, thyme — these work. But apply them sparingly and with a dry hand.
Marinades? Usually not worth it. The tomahawk’s too thick for a marinade to reach past the surface, and the fat in the steak is already doing the job that most marinades try (and fail) to do. If you’re looking for extra flavor, it’s better to finish the steak with something sharp after cooking — a squeeze of lemon, a splash of vinegar, a dusting of smoked chili.
The point of seasoning here isn’t to fix or hide. It’s to frame the steak — like lighting in a gallery. You already painted the canvas. Now you’re just deciding how bold you want the frame to be.
Sides and Pairings That Don’t Compete
A tomahawk steak is already heavy. It’s rich, fatty, deeply savory — and if you’ve cooked it right, it doesn’t need anything competing for attention. That means your sides shouldn’t be louder, richer, or more complicated than the main event. They’re there to keep things moving — to reset your palate between bites, to soak up the juices, to bring contrast.
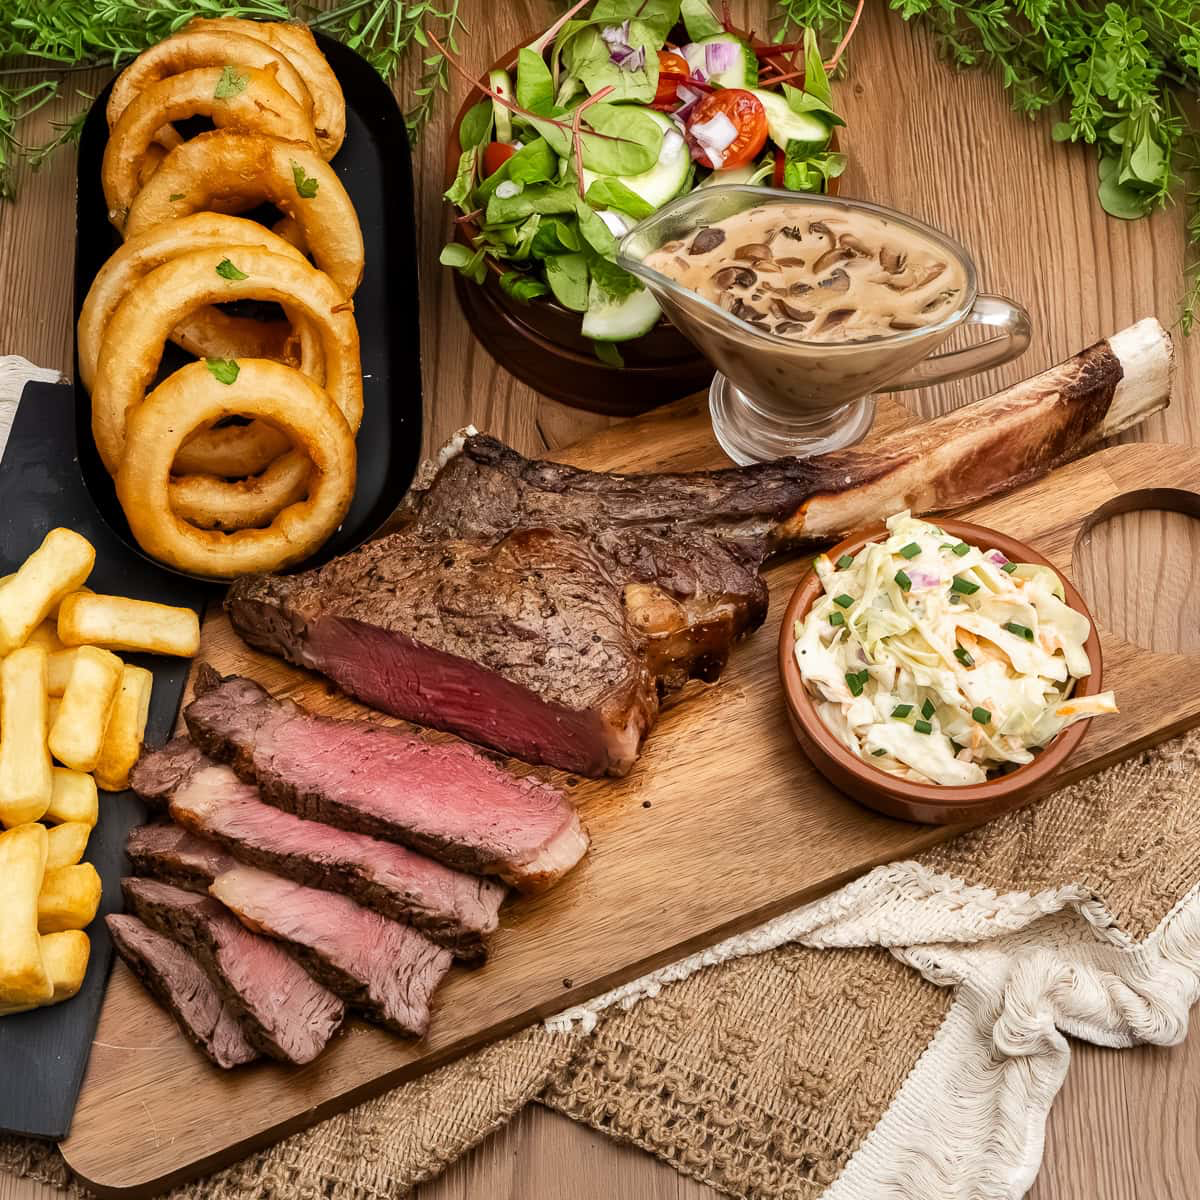
Start with something green. Not creamed. Not buried in cheese. Just clean and sharp. Arugula with lemon, grilled asparagus with a splash of vinegar, wilted spinach with garlic — anything that adds bite without adding bulk. A bitter salad cuts through the fat. A grilled vegetable adds texture. That kind of contrast makes the steak taste better because it gives your mouth a break.
Potatoes? Always welcome — just keep them grounded. Roasted fingerlings with salt and herbs. Crispy smashed potatoes. Maybe a little aioli or mustard, but skip the overloaded mashed or gratin. You’re not building a buffet. You’re building a plate that stays balanced.
If you’re doing starch, think about texture. You want something that holds its shape. Polenta can work — especially if it’s firm and grilled. Toasted bread or grilled flatbread with a bit of char also works. Something to drag through the juices, nothing too soft or creamy.
Sauces? If you must, keep them thin and punchy. Chimichurri. Salsa verde. Horseradish cream if you’re leaning into that steakhouse vibe. No demi-glace, no bordelaise, no stick-to-your-ribs glazes. The steak already did the work — the sauce is just punctuation.
Drinks matter too. A bold red is a classic — think cabernet, syrah, malbec — but don’t go overboard with something that feels like syrup. Dry, structured, and acidic beats sweet or oaky. If you’re pouring cocktails, lean clean: an old fashioned, a highball, something that refreshes, not something that piles on.
And dessert? Not your job tonight. Someone else can bring pie. You made the steak. That’s the memory.
Leftovers — What to Do If You Somehow Have Any
Let’s say you did everything right. You cooked a perfect tomahawk steak, sliced it clean, served it up — and there’s still a thick pile of slices left on the board. Maybe you overestimated appetites. Maybe you made two for a party and only one got finished. Maybe you planned it this way, hoping for round two.
Good. Because leftover tomahawk steak, handled right, might be even better the next day.
First rule: store it well. Don’t toss it on a plate with plastic wrap and shove it in the fridge. You want to keep it from drying out or picking up every smell in there. Wrap it tightly in parchment or wax paper first — that protects the crust. Then seal it in a zip-top bag or airtight container. If you’ve got leftover juices or resting butter, save that too. It’s reheat insurance.
If you’re reheating for another sit-down meal, skip the microwave. Seriously. Reheating steak in a microwave is how you turn medium-rare into gray, leathery disappointment. Instead, bring it back gently. Wrap the slices in foil, add a spoonful of the juices if you saved them, and warm in a 250°F (120°C) oven until just heated through. Or go stovetop: place in a skillet over low heat with a lid on, and let the steam warm it slowly. Finish with a flash-sear if you want to wake up the crust.
Better yet — rework it.
Cold steak, sliced thin, is unbeatable in a sandwich. You’ve got flavor, texture, and richness that doesn’t need melting cheese or sauce. Just mustard, arugula, pickled onion. Maybe a smear of horseradish or a fried egg if you’re feeling aggressive.
It also shines in rice bowls, grain salads, tacos, even pasta. You’re not hiding the steak. You’re building around it. Let it be the anchor in a lighter dish — something that doesn’t feel like a rerun of dinner but still makes use of that deep seared flavor and marbled richness.
Freezing? You can. It won’t ruin it. But be realistic — frozen steak comes back a little drier, a little duller. If you do freeze it, wrap it tight, push out the air, and use it within a month. Reheat gently, and slice thin. It’ll still beat 90% of what you’d get from a takeout menu.
Bottom line: if you’ve got tomahawk leftovers, you’ve got a head start. Don’t rush the reheat. Don’t drown it in sauce. Treat it like the cut it still is — just a little older, a little cooler, and still worth getting right.
FAQ — Tomahawk Steak, Straight Answers
Tomahawk steak brings questions. You stand there holding this thick, bone-in cut that looks like it came from a butcher who moonlights as a blacksmith, and suddenly everything feels high stakes. Do I sear it first? Do I salt it now or later? Is the bone doing anything besides looking cool? These are the things people ask — before, during, and usually right after they realize they might’ve rushed it. So here’s what you need to know, straight up.
What temp should I cook a tomahawk to?
Depends on how you like it, but for medium-rare, pull it at 115–120°F (46–49°C), then sear. After resting, it’ll finish around 125–130°F (52–54°C). Want medium? Pull it around 125°F (52°C) and let it climb to 135°F (57°C). Don’t guess. Use a thermometer.
Is it better on the grill or in the oven?
Depends on what you’ve got. A grill gives you smoke and fire; the oven gives you control. Best move? Use both: oven or indirect grill to bring it up slowly, then finish with a high-heat sear wherever you’ve got the most firepower.
Can I cook it straight from the fridge?
Technically yes, but you’ll have a cold core and an overcooked edge. Let it sit out for 45–60 minutes before cooking. Thick steaks need a head start.
Do I need to rest it even if it’s already thick?
Yes. Thickness isn’t the reason you rest. It’s the temperature gradient — you need to let the inside stabilize and the juices redistribute. Give it at least 10–15 minutes, longer if it’s huge.
Why is it so expensive?
Partly because it’s a ribeye, which is already a premium cut. Partly because you’re paying for the bone and the spectacle. It’s not just meat — it’s drama. You’re buying the experience, not just the protein.
Can I do this without a meat thermometer?
You can, but you’re guessing. And with a steak this size, a bad guess costs money and dignity. Get a thermometer. You don’t have to spend much, and it’ll pay for itself the first time you don’t overcook a $90 steak.
What’s the difference between tomahawk and cowboy steak?
Same cut — ribeye — but a cowboy steak has the bone trimmed short. No long handle. Easier to cook in a pan. Less dramatic on the plate.
Can I use the bone for anything?
Sure. It’s good for stock if you want to simmer it down with some aromatics. Just don’t expect it to add much on its own. Mostly, the bone’s there to impress — and it does that job well.
Should I trim the fat cap before cooking?
Leave it on. It protects the steak, bastes it while it cooks, and crisps up beautifully if you sear it right. You can always trim it after, once it’s rested and you’re carving.
The tomahawk isn’t complicated — just unfamiliar. It cooks like a roast, finishes like a steak, and shows up to the table already doing half the talking. Once you’ve done one, the mystery fades. What’s left is a method: low heat, good timing, hard sear, full rest. And the next time someone asks, “Can you handle one of those?” you’ll already know the answer.