How to Cook Brats in the Oven: Easy, Juicy, and Perfect Every Time

Hi — I’m Chef Marcus, and yes, you can absolutely cook brats in the oven.
I know what you’re thinking. Brats belong on a grill. They need smoke, fire, maybe a little char from the grates and a cold beer in hand. But sometimes life doesn’t give you patio weather or charcoal. Sometimes it gives you a pack of bratwursts and a kitchen with four walls and a working oven.
Good. Because the oven can do more than hold casseroles and bake cookies. It can handle brats — and handle them well — if you know what you’re doing.
Foreword: The First Time I Cooked Brats Indoors
The first time I cooked brats in the oven, it was raining sideways, the grill cover was three blocks down the street, and the propane tank was frozen solid. I was halfway into prepping onions and mustard when I realized I’d either have to make them indoors or order pizza. And I’m not the pizza guy when I’ve got brats in front of me.
So I threw them on a baking rack, set the oven to 400°F, and hoped for the best. What came out? Juicy brats with browned skin and just enough snap to pass the test. Were they smoky? No. Did they need to be? Also no.
Since then, I’ve cooked brats in the oven more times than I can count — for weeknight dinners, for meal prep, for rainy-day football Sundays when I didn’t feel like babysitting a grill. I’ve cooked them on foil, on racks, in beer, next to peppers and onions, even in the middle of winter when the kitchen window was fogged up from the steam and the smell of roasting sausage filled the house.
It’s not a shortcut. It’s just another way to cook them — and if you do it right, it’s one of the most reliable.
Let’s get into the why, the how, and what you need to know to bake brats that come out browned, juicy, and done on your terms.
Why You’d Cook Brats in the Oven (and Why It’s Not Second-Tier)
Grilling brats is great — if the weather cooperates, the grill’s clean, and you’ve got time to tend the fire. But that’s not always the case. Sometimes it’s pouring. Sometimes you’re cooking for six people and the grill only fits four at a time. Sometimes you’re in an apartment where the grill is theoretical. Or it’s January and stepping outside feels like a dare.
The oven doesn’t care. It’s consistent. It gives you steady heat, full control, and the ability to multitask without hovering over the food. If you want your brats browned, hot, and fully cooked through — without worrying about flare-ups, fuel levels, or whether the middle is still raw — the oven does the job.
It also gives you options. You can bake brats by themselves or roast them on a tray with onions and peppers and let everything mingle. You can nestle them into a shallow beer bath with garlic and herbs. You can crisp them up in a hot pan afterward if you want that final texture. And you can do all of that without standing in smoke or watching grease drip through the grates.
Does it replace grilling? No. But it’s not trying to. Oven-baked brats aren’t the backup plan — they’re the reliable one. The one you can pull off in a small kitchen, a tight schedule, or a weeknight where you just want dinner to work.
And if you know how to use the oven well — with a rack, with good timing, with a little care for browning and carryover heat — the end result doesn’t feel like a compromise. It just feels like a solid plate of brats. The kind people go back for.
Understanding Brats — What They Are, What They Need
Bratwursts aren’t just fat hot dogs. They’re fresh sausages — uncooked, usually pork-based, and seasoned with things like nutmeg, coriander, marjoram, or caraway depending on the style. And unlike hot dogs or fully cooked kielbasa, they need to be brought up to a safe internal temperature without splitting their casing or drying out their interior.
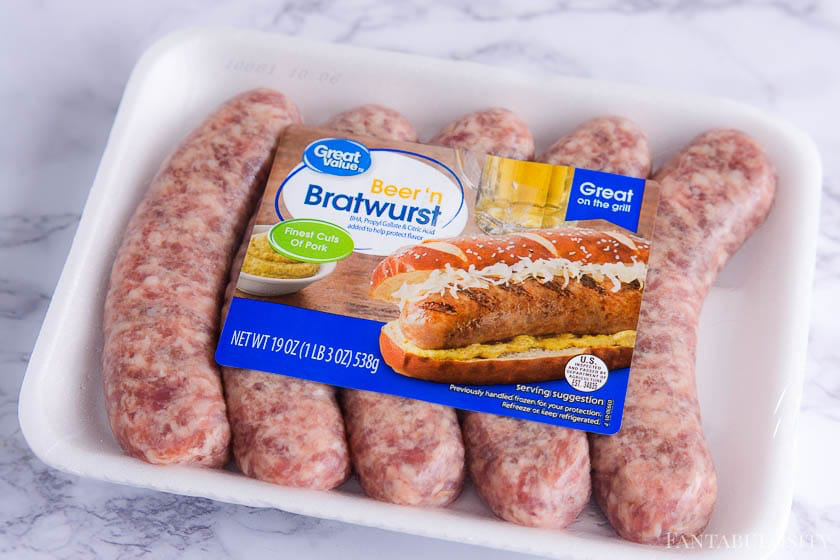
Most brats clock in at about 6–8 inches long and come in natural casings, which give you that signature snap when you bite into them. That casing is delicate. It doesn’t like sudden heat. It doesn’t like being stabbed, squeezed, or ignored. But when you cook it right — low enough to heat the inside, high enough to brown the outside — it holds everything together, locks in moisture, and finishes with a texture you don’t get from pre-cooked sausage.
There are two kinds of brats you’ll run into: raw and pre-cooked. Raw is what we’re focusing on here — it’s pink, soft, and needs to hit 160°F (71°C) internally to be safe. Pre-cooked brats are usually firmer, paler, and just need to be heated through. They’re fine, but they’re not what this guide is about.
Brats are also fattier than many sausages — which is a good thing, but also means you have to watch your cook time. Go too long or too hot and the fat starts to render out too fast. You’ll end up with dry sausage and a puddle of grease on the tray. That’s why we’re using the oven with purpose — giving the heat enough time to get into the middle, but not so much that it evacuates all the juiciness.
The goal is even heat, intact casing, and an internal temp of 160°F. Not 180. Not “eh, it looks done.” You want bite, moisture, and just enough browning to give the brat some attitude without cooking it to death.
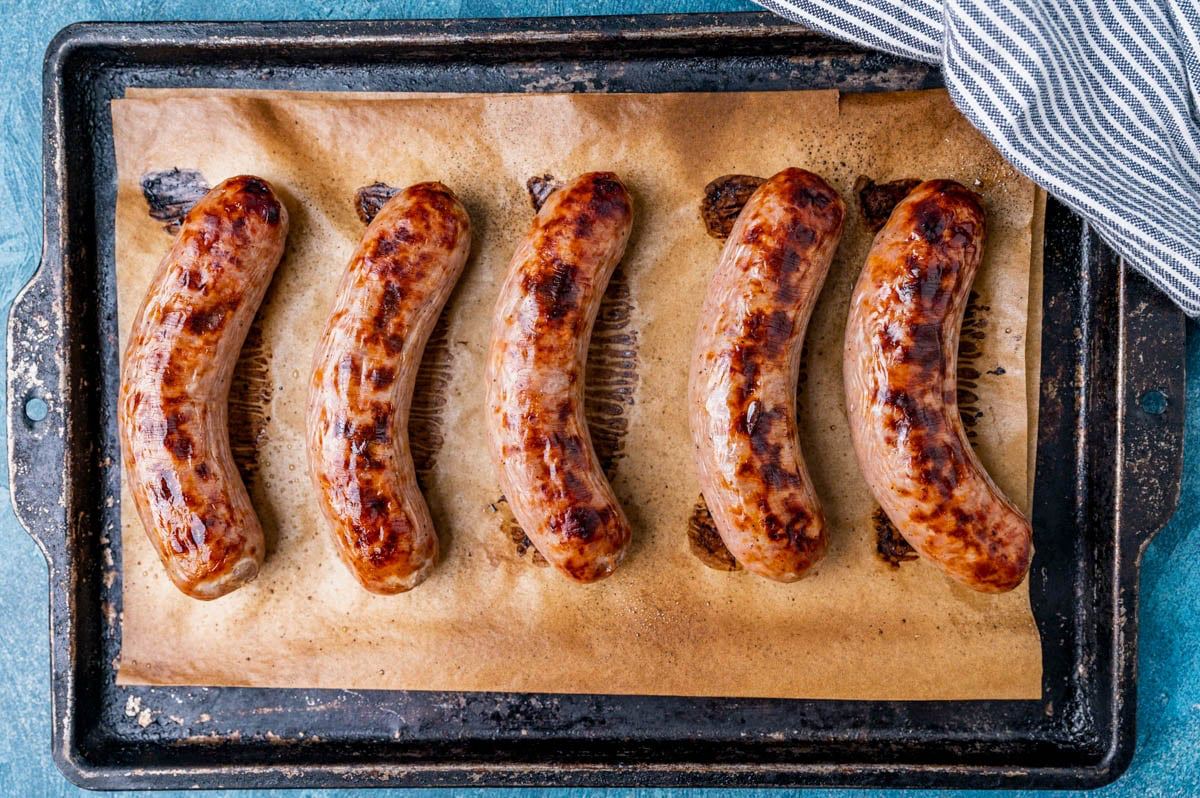
The Best Oven Method — Sheet Pan with a Rack
If you only learn one way to bake brats indoors, let it be this. You’re not reinventing anything — you’re just setting yourself up to get them cooked through, browned on the outside, and juicy in the middle without playing hot-spot roulette inside your oven.
Start by preheating your oven to 400°F (204°C). That’s hot enough to get color and cook the brats through in a reasonable amount of time, but not so aggressive that the casings split open before the inside’s ready.
Set up a rimmed sheet pan with a wire rack inside it. This part matters. The rack lets air circulate underneath the brats so they don’t stew in their own fat. If you skip the rack and cook them directly on the pan, they’ll still work — but you’re likely to get soft spots where the casing sat in rendered fat instead of browning up.
Lay the brats out with space between them. Crowding leads to steam. Steam leads to pale skin and rubbery edges. These things want airflow, not contact.
Slide the tray into the center of the oven and bake for 20 to 25 minutes, flipping them once halfway through. Don’t stab them. Don’t shake the tray. Just turn them gently with tongs when the tops look like they’re starting to brown and the casings start to blister slightly.
How do you know they’re done? Use a thermometer. Stick it into the thickest part of one brat — ideally from the side, not straight down. You’re looking for 160°F (71°C). That’s your safe zone. Don’t wait for them to “look cooked.” They might brown fast on the outside while the inside’s still not there.
Once they hit temp, pull the tray and let the brats rest for five minutes. Not a full steak-style rest — just long enough for the juices to settle so they don’t blast out when you slice into them.
The result? Brats that are browned, snappy, and cooked through with no guesswork. They’ll be sitting just shy of grill-level flavor, and you didn’t have to fight propane or stand in the rain to get there.
Cooking Brats with Peppers, Onions, and Other Add-Ins
Brats are great on their own. But pair them with roasted vegetables — especially onions and peppers — and they stop being just sausage and start being a full plate. Or a sandwich. Or a bowl of something you want to keep eating until it’s gone.
But there’s a right way to roast brats with vegetables. And a few wrong ones.
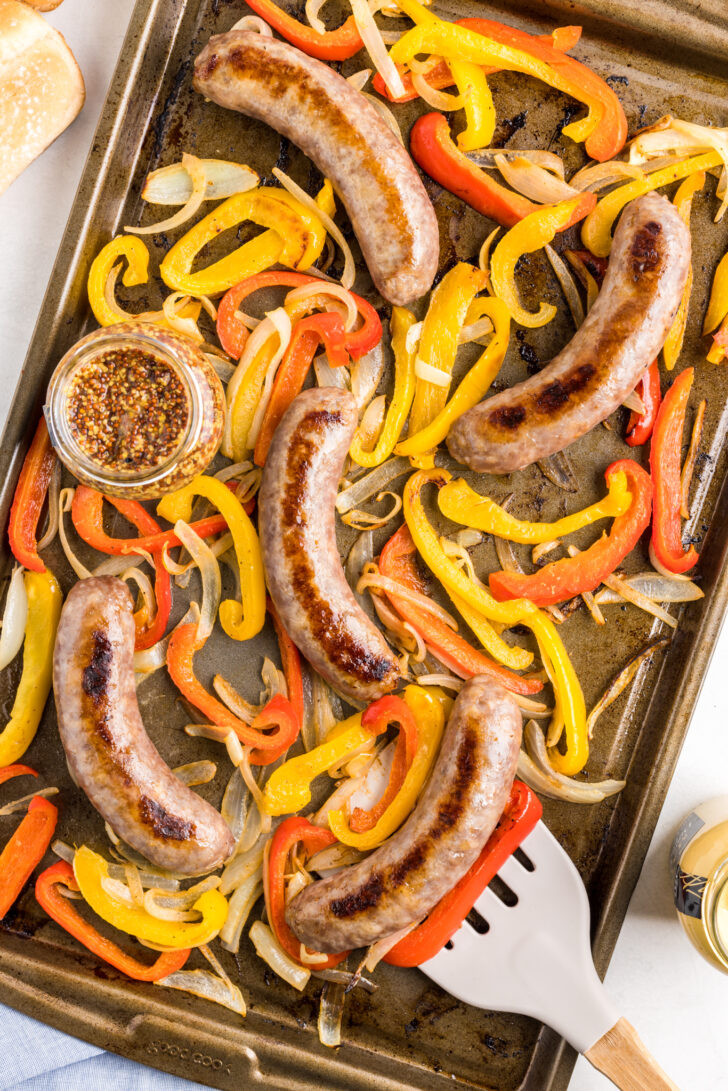
First, give the vegetables room. If you pile sliced onions and peppers under the brats or wedge them too close, they’re not going to roast — they’re going to steam. That’s fine if you want everything soft and a little jammy, but if you want browning, separation is key. Toss the vegetables in a bit of oil, season them lightly, and spread them out around the brats — not underneath. Think in zones, not piles.
Add them at the beginning if they’re thick-cut and you want them caramelized and soft. Add them halfway through if you want them firmer, with a bit of bite left. Either works — just don’t expect the onions to stay crisp or the peppers to hold their color if they roast for the full 25 minutes.
Roasting at 400°F still works here. It’s hot enough to get color on both the brats and the vegetables without burning one before the other’s done. And when everything’s cooked, the onions will have gone sweet, the peppers mellow, and the fat from the brats will have mixed with the veg in a way that feels intentional.
If you want to go further — potatoes, fennel, even cabbage — you can, but watch the moisture. Potatoes take longer and need to be cut small or par-cooked. Cabbage likes a bit of acid to keep it bright. Fennel plays nice with pork but can overpower if left in big wedges.
Sauerkraut? You can add it, but do it near the end, or serve it separately. Oven heat dries it out and dulls the tang. Better to warm it gently in a pan with a splash of beer and let it keep its personality.
Once it’s all roasted, you can serve it straight from the tray, scoop it into buns, or plate it with mustard and call it dinner. It’s a one-pan meal that doesn’t feel lazy — and if you do it right, you get crispy brat skins, soft roasted onions, and that sweet-fat flavor that makes you wonder why anyone ever boiled sausage in the first place.
Beer Brats in the Oven — What Actually Works
If you grew up around tailgates, county fairs, or anyone who owns more than one cooler, you’ve probably heard of beer brats. The usual move is: boil the brats in beer, then toss them on a grill to finish. Thing is, half the time that means overcooked sausage with bland beer broth and no real payoff.
So can you cook beer brats in the oven? Yes. But not by boiling them in a pot and calling it a day. What you want is something closer to a beer steam-roast — using heat and moisture to infuse flavor without killing texture.
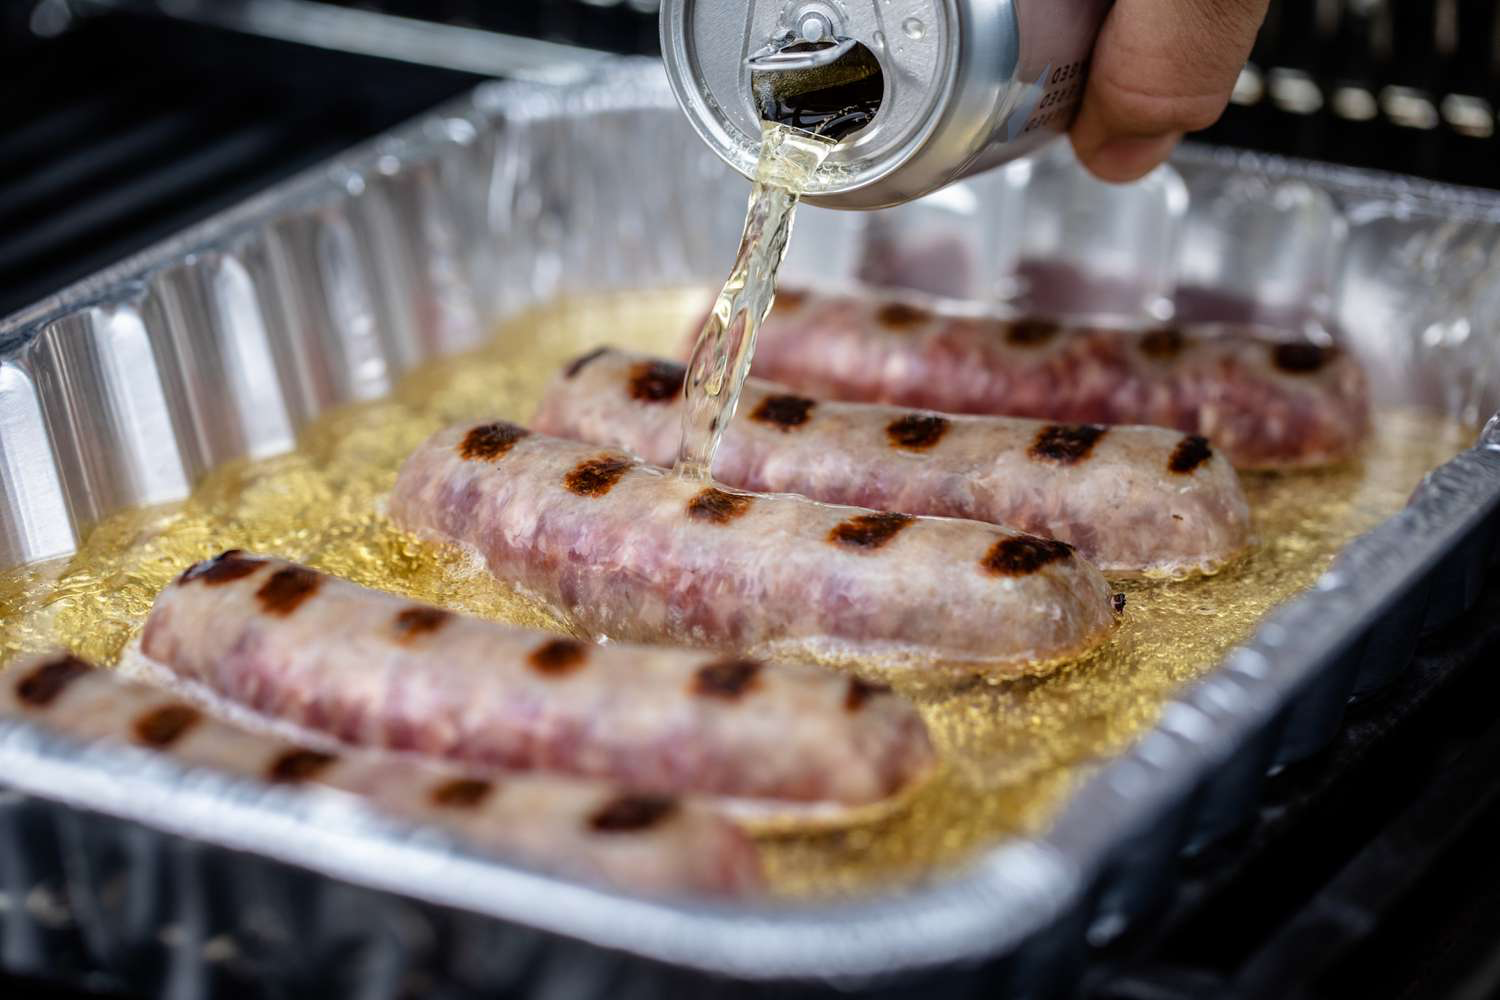
Start with a shallow baking dish or roasting pan. Something that holds liquid without drowning the brats. Slice up a couple of onions — thick enough to hold their shape — and scatter them in the bottom. Lay the brats over the top. Then pour in just enough beer to reach about halfway up the onions. You’re not submerging the brats. You’re creating a steam zone.
Cover the whole thing tightly with foil and bake at 325°F (163°C) for about 25–30 minutes. Low and slow lets the brats cook gently, the onions soften, and the beer mellow out. Don’t go higher unless you’re in a hurry, and don’t skip the foil — otherwise you’ll cook off the liquid before it does any good.
After that first cook, you’ve got two choices. You can uncover and crank the oven to 425°F (218°C) for 10 minutes to finish browning the brats right in the pan — or you can move them to a rack or hot skillet for a final sear. Either works. What matters is that you’re building flavor and keeping texture intact.
As for the beer itself? Go with something clean and malty — amber lagers, bocks, pilsners. You want backbone without bitterness. IPA? Too aggressive. Wheat beer? Can work, but it gets sweet if you reduce it too much. Think “good backyard beer,” not “trendy taproom special.”
If you want to dress it up, throw in a knob of butter before you cover the pan. It softens the onions and gives the beer a little richness. Garlic cloves or mustard seeds are fair game too — not required, but they earn their keep.
And when it’s all done, that beer-onion broth you’re left with? Don’t throw it out. Reduce it on the stove and spoon it over the brats. Or serve it on the side in a little bowl with a ladle and let people dunk their bites. It’s not a sauce exactly — more like edible memory. All the smell and steam from the cook, now in a spoonful.
Pan Finishes — How to Crisp Brats After Oven Cooking
Oven-cooked brats are reliable — juicy, evenly done, and not at risk of bursting open from a too-hot grill. But sometimes they come out looking a little too gentle. No deep browning. No serious sizzle. Just perfectly cooked sausage that could use a little drama.
That’s where the pan finish comes in.
You’re not cooking them again — they’re already at temp. You’re adding color, crust, and a little surface tension. That snap when your teeth hit the skin? This is where it happens.
Use a cast iron or stainless skillet, something that holds heat and gives you a real sear. Nonstick won’t get hot enough, and you’ll end up just warming the outside instead of crisping it.
Bring the pan up to medium-high heat. Don’t add the brats right away. Wait until the surface is properly hot — not smoking, but close. If you toss in a test drop of water and it dances hard, you’re there.
Add a little neutral oil or butter, just enough to coat the surface. Oil gives you a cleaner crust; butter adds flavor but burns faster. If your brats still have a little fat on them, you might not need either — they’ll render out a bit on their own.
Lay the brats in gently. Don’t overcrowd. Give them space to brown. Let them sit untouched for about a minute. Then roll them slightly, let another side hit the heat. Keep going until you’ve got that nice golden blistering in all the right places.
If you roasted your brats with beer and onions earlier, you can drain off the liquid and toss those onions into the same pan while the brats crisp. Let them pick up a little brown, a little fond from the bottom of the pan. Add a spoonful of the beer liquid and scrape the bits loose. Now you’ve got a brat glaze. Now you’re working.
No need to go full sauce unless you want to. But if you do? Deglaze the pan with a splash of beer, a dab of mustard, and a knob of butter. Whisk. Reduce. Done.
The point here isn’t to re-cook — it’s to wake up the finish. You’ve got the structure. This is the shine.
Serving Options — Buns, Boards, and Beyond
You’ve got hot brats coming out of the oven. Maybe you finished them in the pan. Maybe they’re resting on a tray next to a pile of roasted onions. Either way, they’re ready. Now the question is: what are you doing with them?
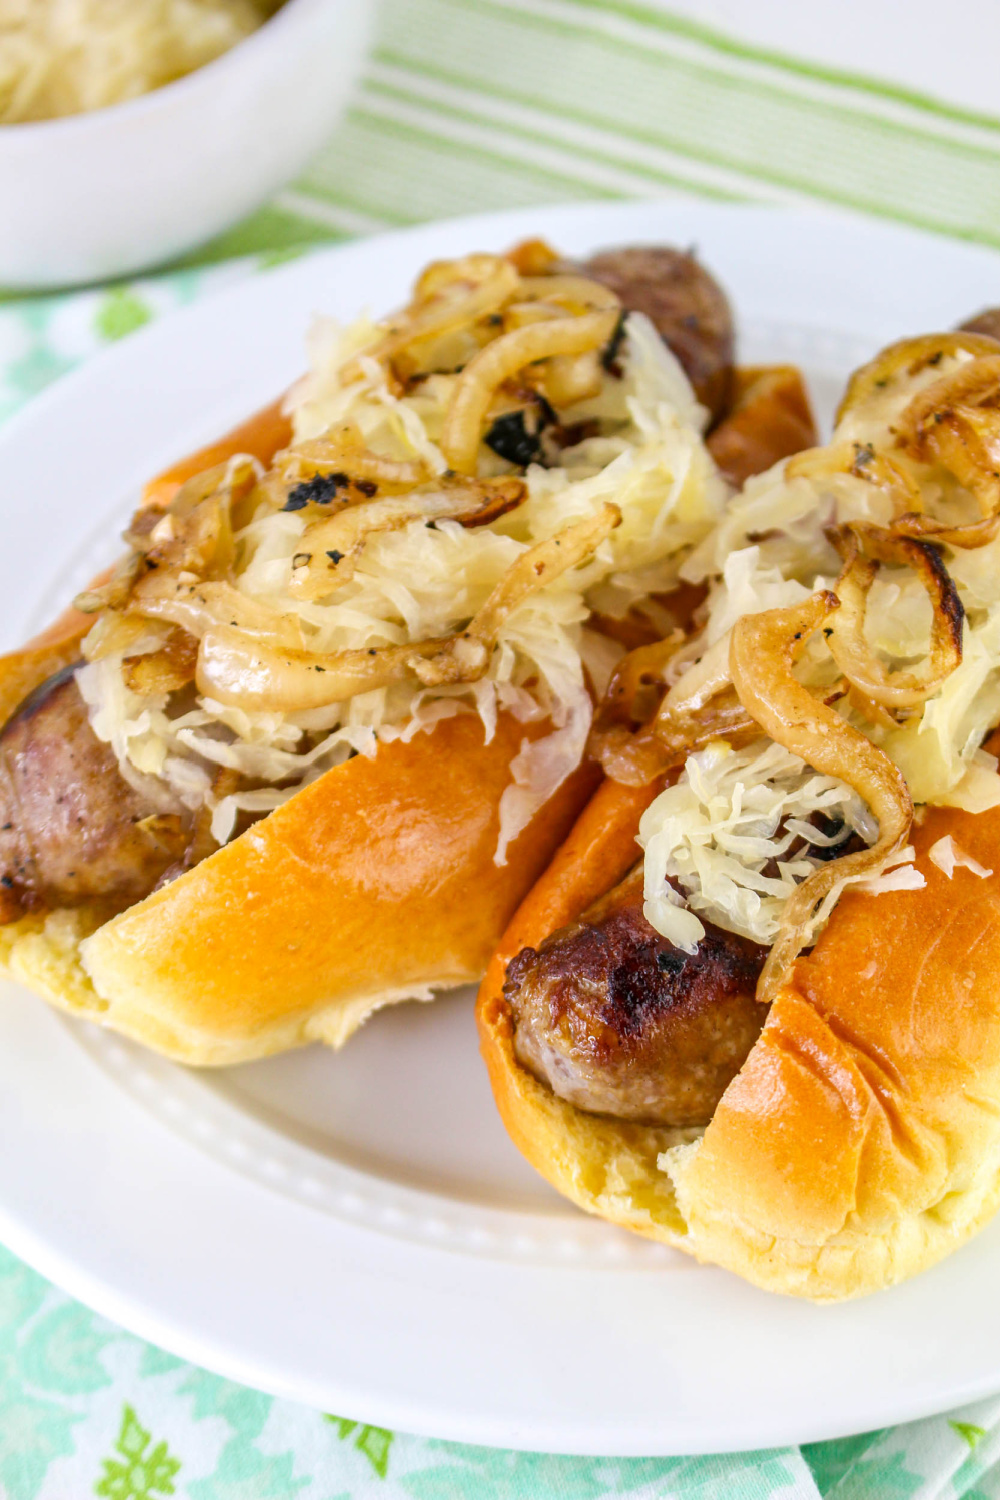
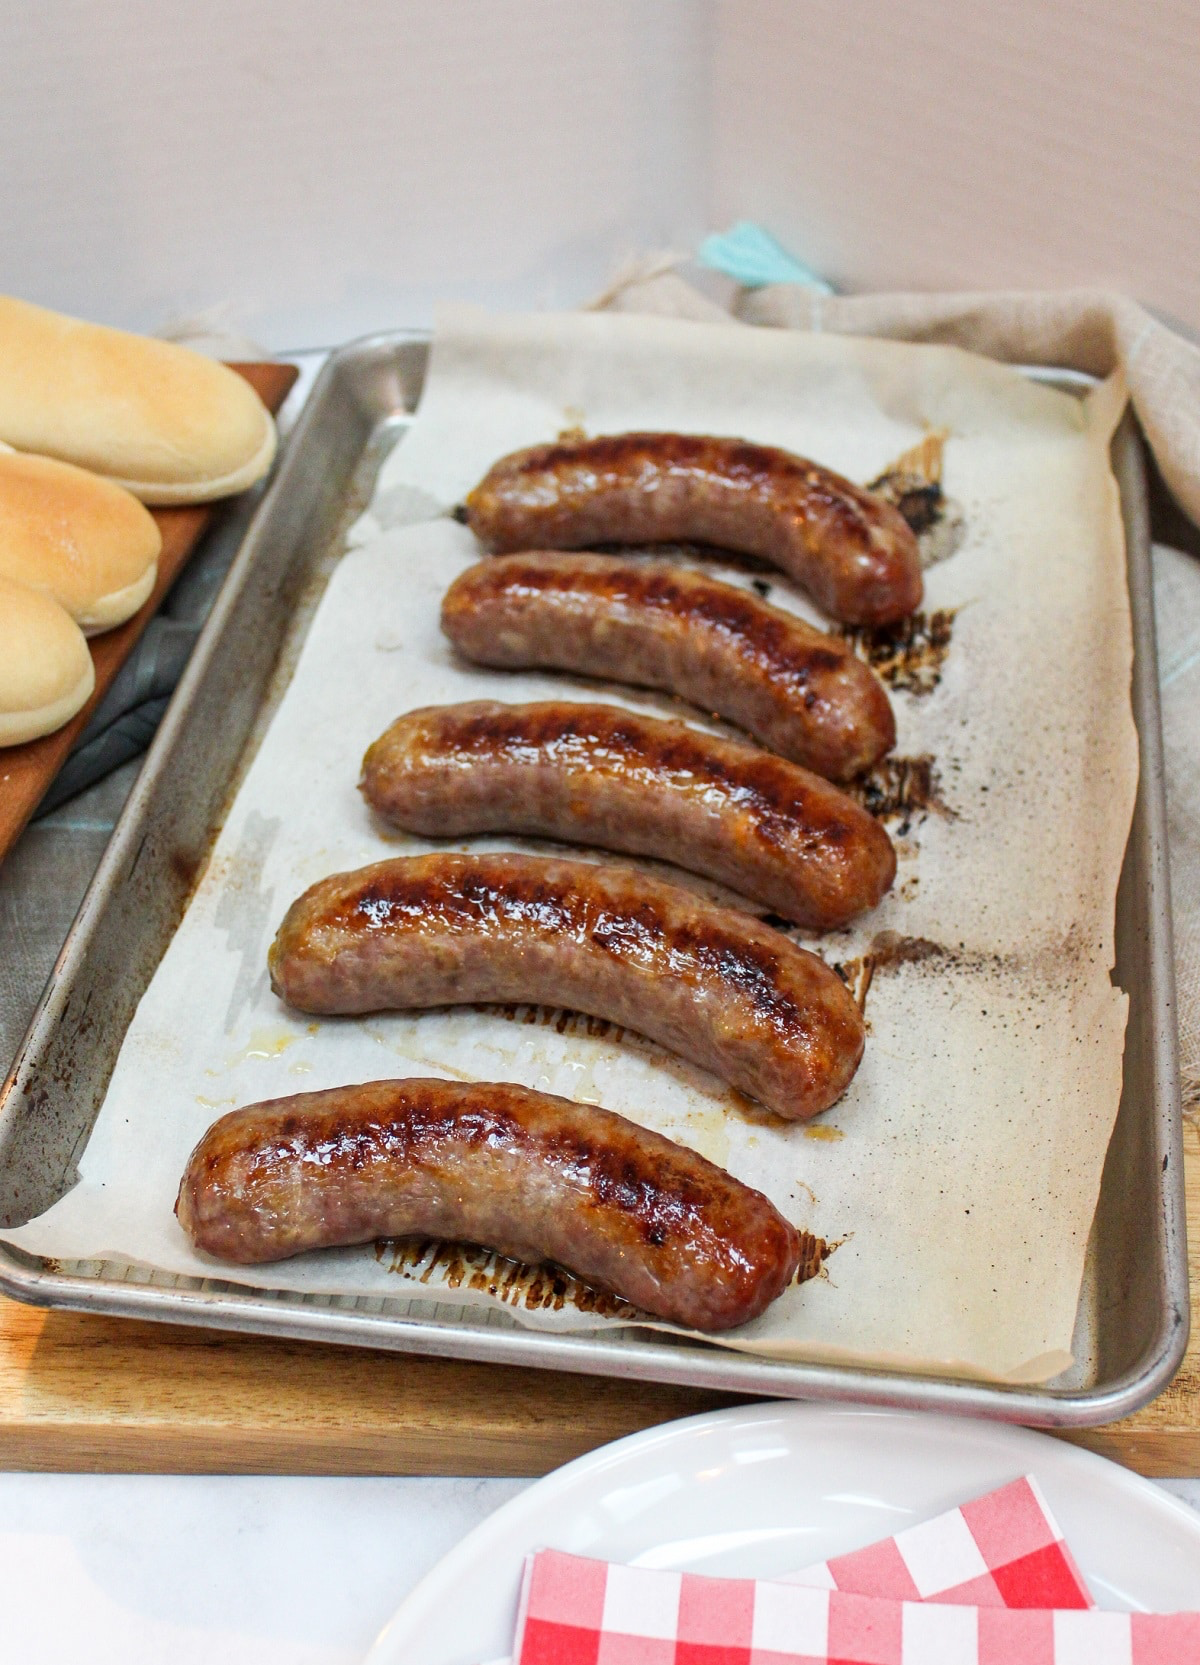
Buns are the obvious move — and a good one, if you treat them right. Don’t grab the cheapest ones and call it done. A brat needs a bun with backbone. Something that can hold up to the weight, the juice, and the toppings without turning into a napkin. Toasted is better. Buttered and toasted is ideal. Even better if you warm them in the oven for a few minutes while the brats finish resting.
Mustard is non-negotiable. You don’t need five kinds, but you need one that actually brings something. Yellow works in a pinch, but grainy or spicy brown takes it further. Horseradish mustard if you want a hit. Dijon if you want sharp. No ketchup. This isn’t a kid’s hot dog.
If you’re feeding a crowd or just want to make things feel more like a meal, build a board. Cut the brats into chunks — thirds or halves on a bias — and plate them with piles of roasted onions, pepper strips, crusty bread, sauerkraut, pickles, a bowl of mustard, and maybe a few fork-ready sides. It turns a sausage dinner into something shareable. And it holds better, too — sliced brats don’t go cold as fast.
Want to go fork-and-knife? Serve them over mustardy potato salad, a heap of warm lentils, sautéed cabbage, or roasted root vegetables. Anything with acid or sharpness plays well. You want contrast — something to balance the richness, not double down on it.
And if you’re done with buns altogether? Brats work sliced into pasta, folded into egg dishes, tossed with greens, dropped into rice bowls. They reheat well, especially if you save the onions and beer from earlier. You can stretch them across multiple meals if you think ahead — or you can just hand them out hot and let people figure it out from there.
The key is to not overthink it. You cooked the brats right. That’s the hard part. Now just get them on a plate, in a bun, or on a board while they’re still hot enough to make someone say, “Wait — these came from the oven?”
How to Store, Reheat, or Cook Ahead
Leftover brats are a gift, not a burden. But only if you treat them with the same attention you gave them the first time. Done right, they’re just as good sliced into something the next day — or rewarmed and piled onto a toasted bun like you meant to do it that way all along.
Storing: Let them cool first. Not all the way to fridge-temp, but enough that they’re not steaming up the container. If you drop them in hot, they’ll sweat, soften the casing, and soak in their own condensation. Wrap them loosely in parchment or paper towels if you’re storing in plastic — that helps protect the skin. Airtight containers, fridge, three to four days max.
If you’ve got leftover beer and onions from the cook, save those too. Store them together if you want to reheat with extra moisture and flavor.
Reheating: Skip the microwave if you can. Or if you use it, slice the brats first, cover with a damp paper towel, and nuke in short bursts. But the better move is the oven — 300°F (150°C), covered in foil, maybe a splash of water or broth in the pan to keep the humidity up. Ten to twelve minutes, depending on how many you’re working with.
If you want to crisp the skin again, finish in a hot pan — just like you would for a pan-finish after an initial bake. You’re not recooking. You’re reviving.
Freezing: It works — but only if the brats are fully cooked first. Wrap them tight, use freezer-safe containers or vacuum seal if you’re serious. Thaw overnight in the fridge and reheat the same way you would leftovers. The texture might take a small hit, but they’ll still eat well if you treat them gently.
Cooking ahead: You can roast brats early in the day and finish them later. Just stop short of full doneness — maybe pull them at 145°F, cool them down, and then crisp and finish in a hot pan when it’s time to serve. Works great for parties or big batches where you don’t want to babysit the oven at the last minute.
Whether you’re cooking for the next meal or just salvaging what’s left from the last one, the rules are the same: don’t dry them out, don’t blast them with heat, and don’t assume the best part of the brat was already behind you.
FAQ — Oven Brats, the Real Questions
Even when brats are simple, the questions come fast. Should you poke them? Flip them? Cover them? What’s normal, what’s not, and what do you do when something weird happens halfway through the cook? These are the kinds of questions that show up right when your hands are full and the oven’s already hot. So here’s the cheat sheet — straight answers for common brat problems, oven edition.
Do I need to poke holes in the casing?
No — and you shouldn’t. Poking holes lets fat and juices escape, which dries out the brat and kills the snap. The casing’s there for a reason. Leave it alone.
Why did my brats split open?
Usually heat’s too high or they cooked too fast. If the casing tightens before the inside cooks through, it bursts. Use moderate heat (400°F or lower) and give them time.
Can I cook frozen brats in the oven?
Technically yes, but expect uneven cooking and longer time. Better to thaw them first — either overnight in the fridge or in a sealed bag under cold water.
Should I cover the pan while they bake?
Not unless you’re going for steamed or beer-braised brats. For dry-roasted, browned brats, leave the pan uncovered so the casings firm up and color develops.
Can I cook brats and vegetables together?
Yes — just space things out. Crowded trays steam instead of roast. Start everything together if you want soft, blended flavors. Add veggies later if you want more texture.
What if I don’t have a rack?
Use parchment or foil on a sheet pan and flip the brats halfway through. You won’t get the same airflow or even browning underneath, but it still works.
How do I keep them from drying out?
Don’t overcook. Use a thermometer and pull at 160°F. If they’re already cooked and you’re reheating, use low heat and moisture — oven at 300°F, covered, with a splash of broth or beer.
Can I use the drippings for sauce or gravy?
Yes — especially if you roasted with onions or beer. Scrape the pan, reduce with a splash of mustard or vinegar, whisk in butter. Instant brat pan sauce.
Are oven-baked brats safe if they’re still a little pink?
Color’s not the best guide. Go by temperature. If they’ve hit 160°F and held it for a minute, they’re safe — even if there’s a hint of pink from seasoning or lighting.
How long do cooked brats last in the fridge?
Three to four days. Keep them wrapped tight, separate from raw meat, and reheat gently. If they smell off, toss them. No second chances with sausage.
Most brat questions boil down to timing, heat, and what not to mess with. Once you’ve cooked them a few times — whether you’re roasting them solo, with veggies, or in beer — you start to get a feel for the rhythm. Don’t overthink the casing. Don’t crank the heat out of impatience. And if something goes sideways, chances are it’s fixable. Oven brats aren’t precious — they’re practical. You just need to know how to steer.
Closing: Not Grilled, Still Great
Oven brats don’t come with a built-in story the way grilled ones do. There’s no fire to poke at, no smoke in your eyes, no backyard setting with a drink in your hand. But what they do offer is control — steady heat, reliable results, and the kind of setup that works whether you’re cooking for two people on a Tuesday or prepping a tray for game day.
Once you get the rhythm down — the right temp, the right finish, the right way to keep the casings intact — the oven stops feeling like a fallback. It becomes just another way to cook them well. No compromise, no flair, just food that tastes like someone knew what they were doing.
And if it happens to be raining, snowing, or just too much effort to light the grill? Even better. You’ve already got what you need.