Slow Cooker Beef Tips and Gravy: Tender, Rich, and Homemade

Hi — I’m Chef Marcus, and if you’ve ever tried to make beef tips in a slow cooker and ended up with shoe leather in brown soup… I’ve been there.
This is one of those dishes that should be automatic. You throw beef into a slow cooker, pour in some broth, walk away, and come back to something rich and fork-tender, right? Except that’s not what happens if you do it the way most instructions tell you to. What happens is dry, chewy meat and a sauce that tastes like warm water and disappointment.
But slow cooker beef tips with gravy can be great. Not just good-for-a-slow-cooker great — actually good. You just have to treat it like a dish worth cooking, not a dump-and-go shortcut.
- Foreword: The First Time I Tried to Make It
- What Are Beef Tips, Really?
- Choosing the Right Cut
- Why You Brown It First (and How to Not Skip It)
- The Liquid Situation — Stock Isn’t Enough
- Building the Gravy — Thick, But Not Like Wallpaper Paste
- Cook Time and How to Know When It’s Actually Done
- Additions — What to Cook With the Beef (and What to Add Later)
- What to Serve It With (and What Actually Soaks Up the Gravy)
- Storage, Leftovers, and Reheating
- FAQ — Beef Tips and Gravy, Real Questions
- Closing: It’s Not Just a Pot of Beef — It’s How You Cook It
Foreword: The First Time I Tried to Make It
I was in my early twenties, cooking for a girl I liked. She said her favorite meal was “beef and gravy with mashed potatoes,” and I thought, Perfect. Easy. I picked up a pack of pre-cut stew meat, dumped it in the slow cooker with a couple packets of brown gravy mix, added water, and set it to low.

Eight hours later, the meat was gray and tight. The sauce was thin and somehow both greasy and bland. I served it anyway. She was polite about it, but halfway through the meal she asked if I had any hot sauce. That was the moment I learned: even comfort food has rules.
Since then, I’ve figured out how to get it right. Not fancy. Not fussy. Just done with some intention. Beef that breaks apart with the side of a fork but still has texture. Gravy that tastes like something you’d mop up with bread. And timing that lets you leave it alone without coming back to a wreck.
If you’ve got a slow cooker, a pack of chuck, and a little time, I’ll show you how to do it properly — with flavor, with structure, and with a finish that actually belongs on a plate of mashed potatoes.
Let’s get into it.
What Are Beef Tips, Really?
The first time I saw “beef tips” on a menu, I pictured something fancy. Maybe something from the tenderloin, trimmed into neat little bites, served with a wine reduction and a starch that required a ramekin. Then I started cooking for real and realized: beef tips is just a polite way of saying “the pieces left over after the good cuts are spoken for.”
There’s no official cut called “beef tips.” The term’s vague on purpose. Sometimes it’s sirloin, sometimes it’s chuck, sometimes it’s the random end bits from whatever the butcher was trimming that day. The packaging isn’t going to tell you much — it’ll just say “beef tips” or “stew meat” and expect you to figure it out.
And that’s the problem. Because the difference between tender, slow-cooked beef and something that chews like overcooked liver depends entirely on what kind of meat you’re actually working with.
If you’re buying pre-cut stew meat, you’re playing beef roulette. Some of it may be chuck. Some might be round. Occasionally you’ll get a bit of sirloin in the mix — but don’t count on it. The textures won’t all match, and some pieces may cook faster than others. That’s why I prefer to start with a whole piece and cut it myself.
Chuck roast is the go-to here. It’s got marbling, connective tissue, and enough fat to stay juicy even after hours in the pot. Sirloin can work if you want firmer bites and you’re watching the clock, but it’s less forgiving. Round is leaner and tougher — I avoid it unless I’m planning to slice it thin and treat it more like pot roast.
What you want from beef tips is simple: a cut that breaks down slowly, gets tender with time, and can hold up in a rich, savory gravy without vanishing into shreds. Something that still feels like meat by the time you’re eating it.
So don’t trust the label. If it says “beef tips,” treat that as a suggestion — and look for a whole chuck roast instead. Trim it yourself. Cut it into big, even cubes. That alone sets you up for better texture, better flavor, and a dish that feels like it was made on purpose — not just ladled out of a slow cooker and hoped for the best.
Choosing the Right Cut
If you’re standing in front of the meat case wondering what to grab for beef tips, here’s the short version: start with chuck, unless you’ve got a reason not to.
Chuck is the cut that’s made for long cooking. It’s worked harder than the rest of the cow, which means it’s full of connective tissue and intramuscular fat — and both of those things break down beautifully when you give them time and moisture. It’s forgiving. It goes tender without going mushy. And it actually wants to live in a slow cooker.
But not all chuck is equal.
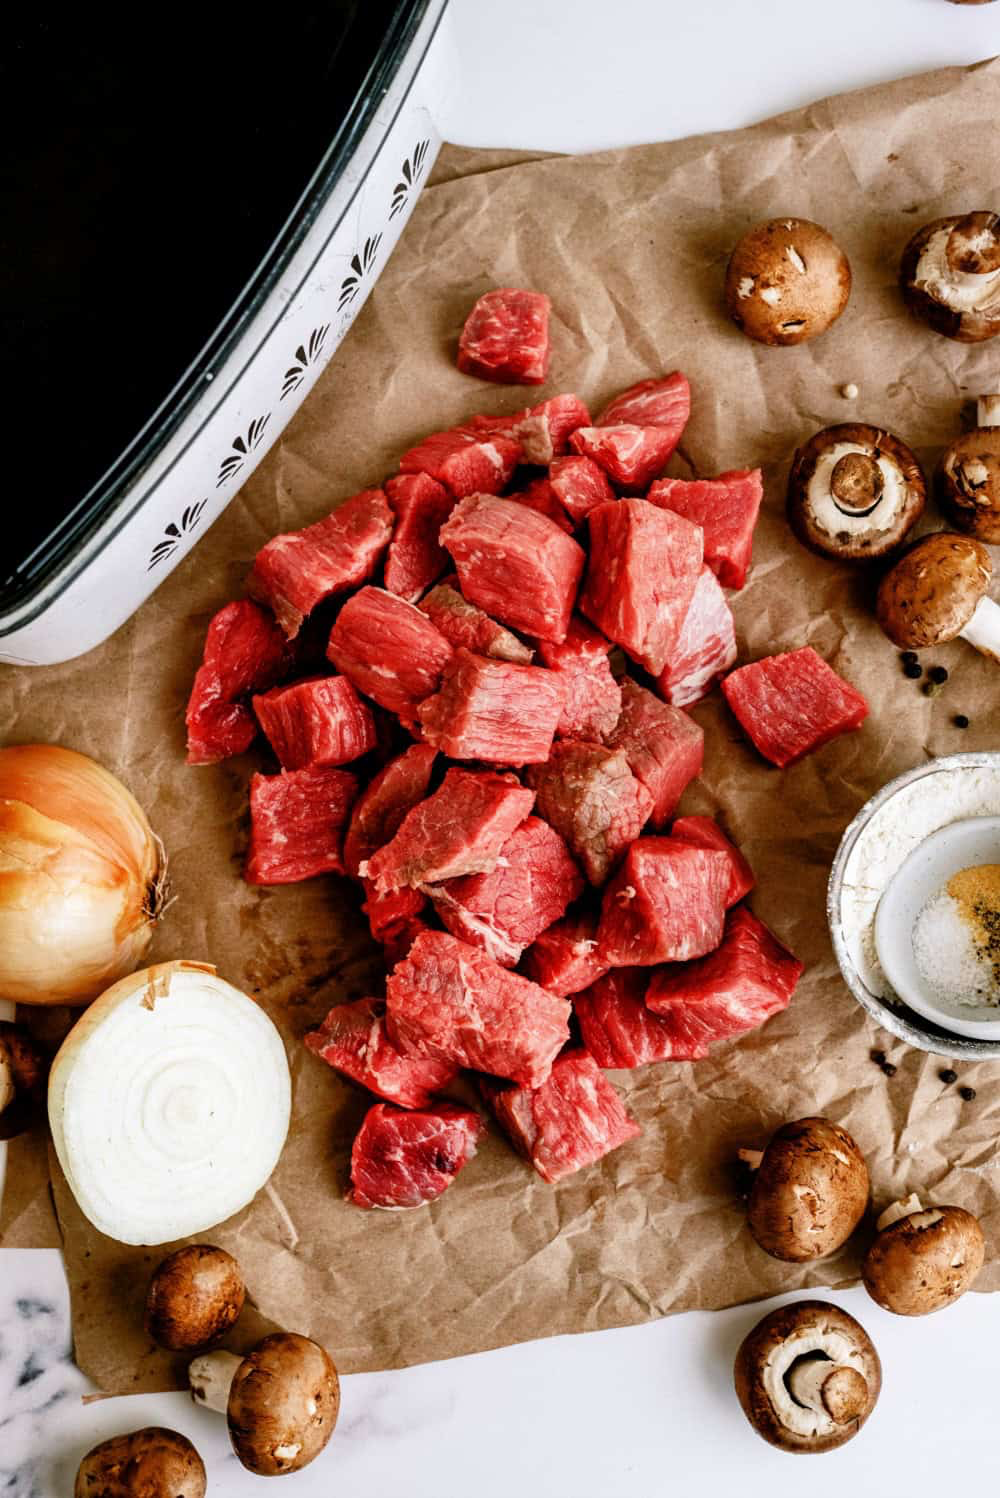
If you buy it whole — a chuck roast or shoulder roast — you’re in charge. You get to trim the big sheets of fat, cube it into even chunks, and keep the size consistent. That means the whole pot finishes at the same time. Nothing tough. Nothing falling apart before the gravy’s even thickened.
Pre-cut stew beef is a gamble. You might get chuck. You might get a leaner cut like bottom round or top round, which tightens up in the cooker and never quite relaxes again. And even if the cut’s decent, the pieces are usually uneven — some huge, some stringy, some with silver skin that should’ve been trimmed but wasn’t.
Sirloin is a maybe. It’s leaner, with a tighter grain. It cooks faster, so you need to watch your timing. If you like your beef to hold its shape and stay biteable, it’s fine — but don’t leave it in for six hours and expect it to stay soft.
Avoid anything labeled “eye of round” or “sirloin tips” if you’re slow cooking and want tenderness. They look good in the package — lean, red, trimmed — but they’re too tight for this. They need a hot sear and fast slicing, not a slow bath in gravy.
And whatever you choose — cut it big. This isn’t stir-fry. You’re going to lose moisture during the cook. If the pieces start small, they’ll finish dry. Aim for chunks about the size of a walnut, maybe a little bigger. Big enough to hold their shape, small enough to break apart with a fork if you want them to.
This is one of those times when doing it yourself is the move. You get better texture, better control, and way fewer surprises when the lid finally comes off.
Why You Brown It First (and How to Not Skip It)
I used to skip this step, too. I’d cube the beef, toss it in the slow cooker raw, pour in stock, and pat myself on the back for making “real food” with no extra effort. But the meat came out tasting like stew — not beef. It was tender, sure. But it was flavorless. Soft without substance. The gravy tasted like it came from a jar. And it all looked the same shade of beige.
Then I started browning the beef first. Just a few minutes in a pan, in batches, without rushing it. And everything changed.
Here’s the thing: slow cookers don’t build flavor. They hold and soften what you give them. If the beef goes in pale, it comes out soft and pale. If it goes in with a dark sear and caramelized edges, those flavors spread into the gravy as it cooks. The brown bits left in the pan — the fond — are pure umami, and you’re going to want that.
To get a good sear, you need a hot pan and dry meat. Pat the beef chunks down with paper towels before they hit the skillet. Get the pan hot — not screaming, but enough that oil shimmers and the beef sizzles the second it hits. Don’t crowd the pan. If the pieces are touching, they’ll steam. Do it in two or three rounds if you have to. This isn’t the fast part. This is the part that makes the fast part worth it.
And once you’ve seared all the meat, don’t toss the pan. You’re going to have dark, sticky bits stuck to the bottom — that’s the good stuff. Deglaze with a splash of broth, wine, or even water. Scrape it with a wooden spoon until everything loosens up. Then pour that liquid into the slow cooker with the beef. That’s not just “juice.” That’s what gives the gravy its backbone.
Can you skip this step and still get something edible? Sure. But it won’t taste the way it could. It won’t smell the same, it won’t look the same, and the first bite won’t stop anyone mid-sentence.
If you’re truly short on time, fine — sear half. Or just brown the surface of a whole roast before you cube it. Even a partial sear is better than nothing.
But if you want beef tips that taste like beef — not just meat — you start in a pan.
Next: let’s talk liquid. Not just “what to pour in,” but how to build a base that actually becomes gravy later — not soup. Because stock alone doesn’t cut it.
Let’s get into the part most slow cooker recipes mess up completely — the liquid. Because “add beef broth” is not a plan. And if all you’re doing is covering meat in stock and walking away, you’re not making gravy. You’re making beige beef water.
The Liquid Situation — Stock Isn’t Enough
The first time I followed a beef tips recipe to the letter, I used two cups of store-bought beef broth and a spoonful of Worcestershire sauce. That was it. Six hours later, the meat was soft, but the “gravy” was watery, thin, and tasted like it had been filtered through a saltine cracker. The kind of sauce that needs apology mashed potatoes underneath just to make it edible.
So here’s what I’ve learned: if you want gravy at the end, you have to build it at the beginning.
Beef broth (even the good kind) is just the starting point. It gives you body, sure — but it’s not rich enough on its own. It doesn’t carry real flavor unless you give it something to bind to. And in a slow cooker, where everything stays sealed in and no flavor gets concentrated, weak liquid stays weak for hours.
What you need is balance — and a few things that turn that liquid into a base, not just filler.
Start with less broth than you think you need. Just enough to come about halfway up the beef. You’re not boiling this — you’re braising. The meat will release moisture as it cooks. The sauce will expand. And if you drown the beef now, the gravy won’t have a chance to thicken or develop any depth.
Add a splash of something acidic or sharp — red wine, a little balsamic, even just Worcestershire or soy sauce. Not too much. This isn’t a stew. But that bite cuts through the fat and rounds out the sauce. It also brings color and contrast — things that beef and broth alone don’t provide.
I usually add a spoonful of tomato paste when I deglaze the pan after browning. It doesn’t make the dish taste like tomato — it just adds richness. You could also use miso, anchovy paste, or even a little bit of Dijon mustard. You’re not going for obvious. You’re going for depth.
You can add herbs or garlic here, too — but keep them grounded. Thyme, bay leaf, black pepper. This isn’t the place for rosemary sprigs or wild spice blends. Think background music, not a solo act.
And don’t forget salt — but hold back a little. Taste the liquid once it’s warm, before it goes into the cooker. You want it seasoned, but not finished. The flavors will concentrate a bit over time — just not as much as you’re used to if you normally reduce things on the stove.
Once it’s all in the pot — beef, browned fond, reduced liquid — you should see meat that’s mostly surrounded by sauce, not floating in it. That’s your starting point. That’s the difference between six hours of simmering and six hours of soaking.
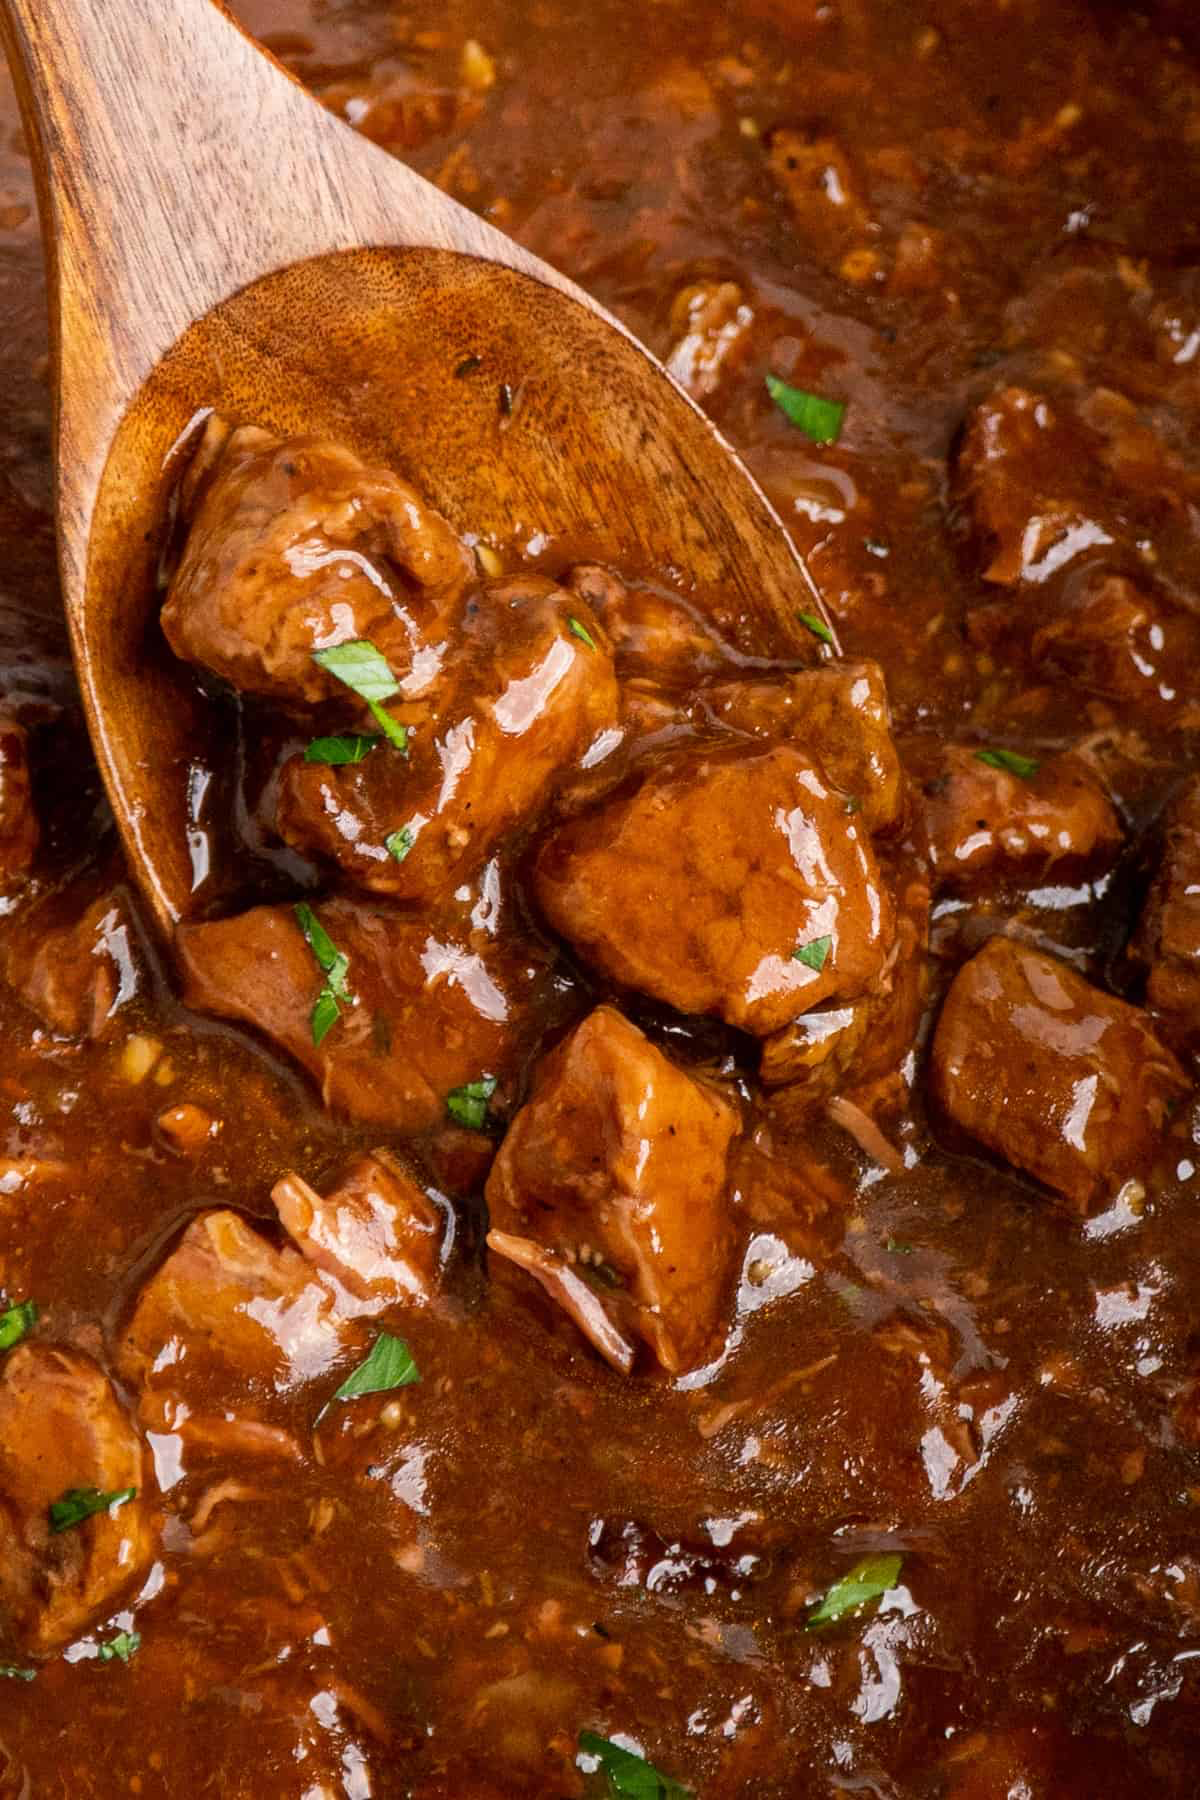
Building the Gravy — Thick, But Not Like Wallpaper Paste
The first time I tried to thicken gravy in a slow cooker, I did what the internet told me. Mixed cornstarch and water, poured it straight in, and watched the whole thing go from thin and soupy to weirdly glossy and still flavorless. It thickened, sure. But it didn’t get better. It just got heavier.
That’s when I realized gravy isn’t just a texture — it’s a flavor delivery system. And it only works if you give it something worth carrying.
If you’ve built a good liquid base — broth, fond, a splash of something sharp, and enough fat to carry it — you’re already halfway there. Now the question is when to thicken and how to do it without killing the flavor or the feel.
Here’s what doesn’t work: thickening at the beginning. If you add flour or cornstarch too early, it just breaks down. Worse, it can make the whole pot taste a little flat — like canned soup that someone tried to doctor with a tablespoon of starch. It holds together, but it doesn’t sing.
Instead, let the sauce cook on its own first. Give the beef time to soften. Let the flavors settle in. Then — in the last 30 to 45 minutes — check the consistency. If it’s thin and loose, you’ve got two choices: reduce it or thicken it.
If it just needs to tighten up, crack the lid and let the steam out. That alone can bring a watery sauce into a proper gravy zone, especially if your cooker runs hot.
If you do need help, the slurry method is the safest: a tablespoon or two of cornstarch whisked into cold water, then stirred into the pot slowly while it’s hot. Stir gently. Lid back on. Give it 15–20 minutes to work. The key is not to overdo it — too much, and the gravy turns into sauce-jello.
You can also thicken it with a butter-flour roux, which adds more richness — but that works best on the stovetop. Pour the gravy into a saucepan, bring it to a simmer, whisk in the roux, and let it cook a few minutes until smooth. Great if you’re serving this for company and want a glossy, spoon-coating finish.
And if it’s too greasy? That’s a fat issue, not a thickening problem. Use a spoon to skim off the top, or chill it and scoop the fat once it sets. Don’t just thicken greasy sauce — all you’re doing is locking in the imbalance.
The goal here isn’t to make gravy that sticks. It’s to make gravy that moves just slow enough to cling to a forkful of beef, run into the mashed potatoes, and make you want another bite. And that only happens if you wait until the flavors are there before you go messing with the texture.
Let’s talk about timing — not just how long to cook beef tips, but how to tell when they’re actually done. Because a slow cooker might keep cooking forever, but that doesn’t mean the beef’s getting better.
Cook Time and How to Know When It’s Actually Done
The first time I made beef tips in a slow cooker, I followed the recipe to the minute. Six hours on low. That’s what it said. So that’s what I did. The beef was soft, but not in the way I wanted — it had this stringy, shredded texture, like pot roast that missed its window. The pieces broke apart if you looked at them wrong. They weren’t tender — they were tired.
Here’s what I didn’t understand yet: time isn’t the point. Feel is.
A good batch of beef tips finishes in a range. Maybe five hours. Maybe seven. Depends on your cooker, your meat, and how it’s cut. What you’re looking for isn’t “fall-apart tender.” That’s stew. What you want is beef that holds its shape, breaks with a fork, and chews like it’s supposed to still be food — not something someone else already chewed.
The key is checking without rushing it. Don’t start poking around at hour three. If you’re cooking on low, give it at least four hours before you lift the lid. Every time you open it, you lose heat — and slow cookers recover slowly. When you finally do check, pull out a piece. Let it cool for a few seconds. Press it with a fork. It should yield, not crumble.
If it’s still chewy, it’s not ready. If it falls apart with no pressure, you’ve probably gone a little long — but it’s salvageable. Just don’t stir aggressively or you’ll end up with beef shreds in gravy instead of tips.
Cut size plays a role, too. Bigger chunks take longer. Smaller chunks might finish fast but dry out if you’re not watching. That’s why consistent sizing matters when you’re trimming the meat — not for looks, but for timing.
You’ll also notice a shift in the gravy when it’s close. It goes from thin and cloudy to darker, smoother, and more fragrant. The meat releases collagen. The sauce binds. The aroma changes. That’s when you check.
And if you’re not sure? Taste it. You’ll know. A bite that stops you mid-sentence? Done. A bite that makes you reach for a knife? Give it another hour and don’t stir until then.
Additions — What to Cook With the Beef (and What to Add Later)
I’ve had beef tips with gravy that smelled amazing — rich, beefy, deep — and then I took a bite and couldn’t tell if I was chewing a mushroom, an onion, or a soggy potato. Everything had the same texture. Everything had the same taste. It was all just… brown. That’s what happens when you put everything in the pot at the start and hope for the best.

Some ingredients belong in there from the beginning. Others need to show up late if you want them to bring anything to the table besides bulk.
Let’s start with the basics: onions are fine to add early — if you sauté them first. Raw onions tossed into the slow cooker tend to go pale and limp, and their flavor gets flattened into the broth. But cook them down a little before they go in and they’ll melt into the background with sweetness and body. Same with garlic — raw garlic in a slow cooker often goes sharp or bitter. Sauté it. Let it mellow first.
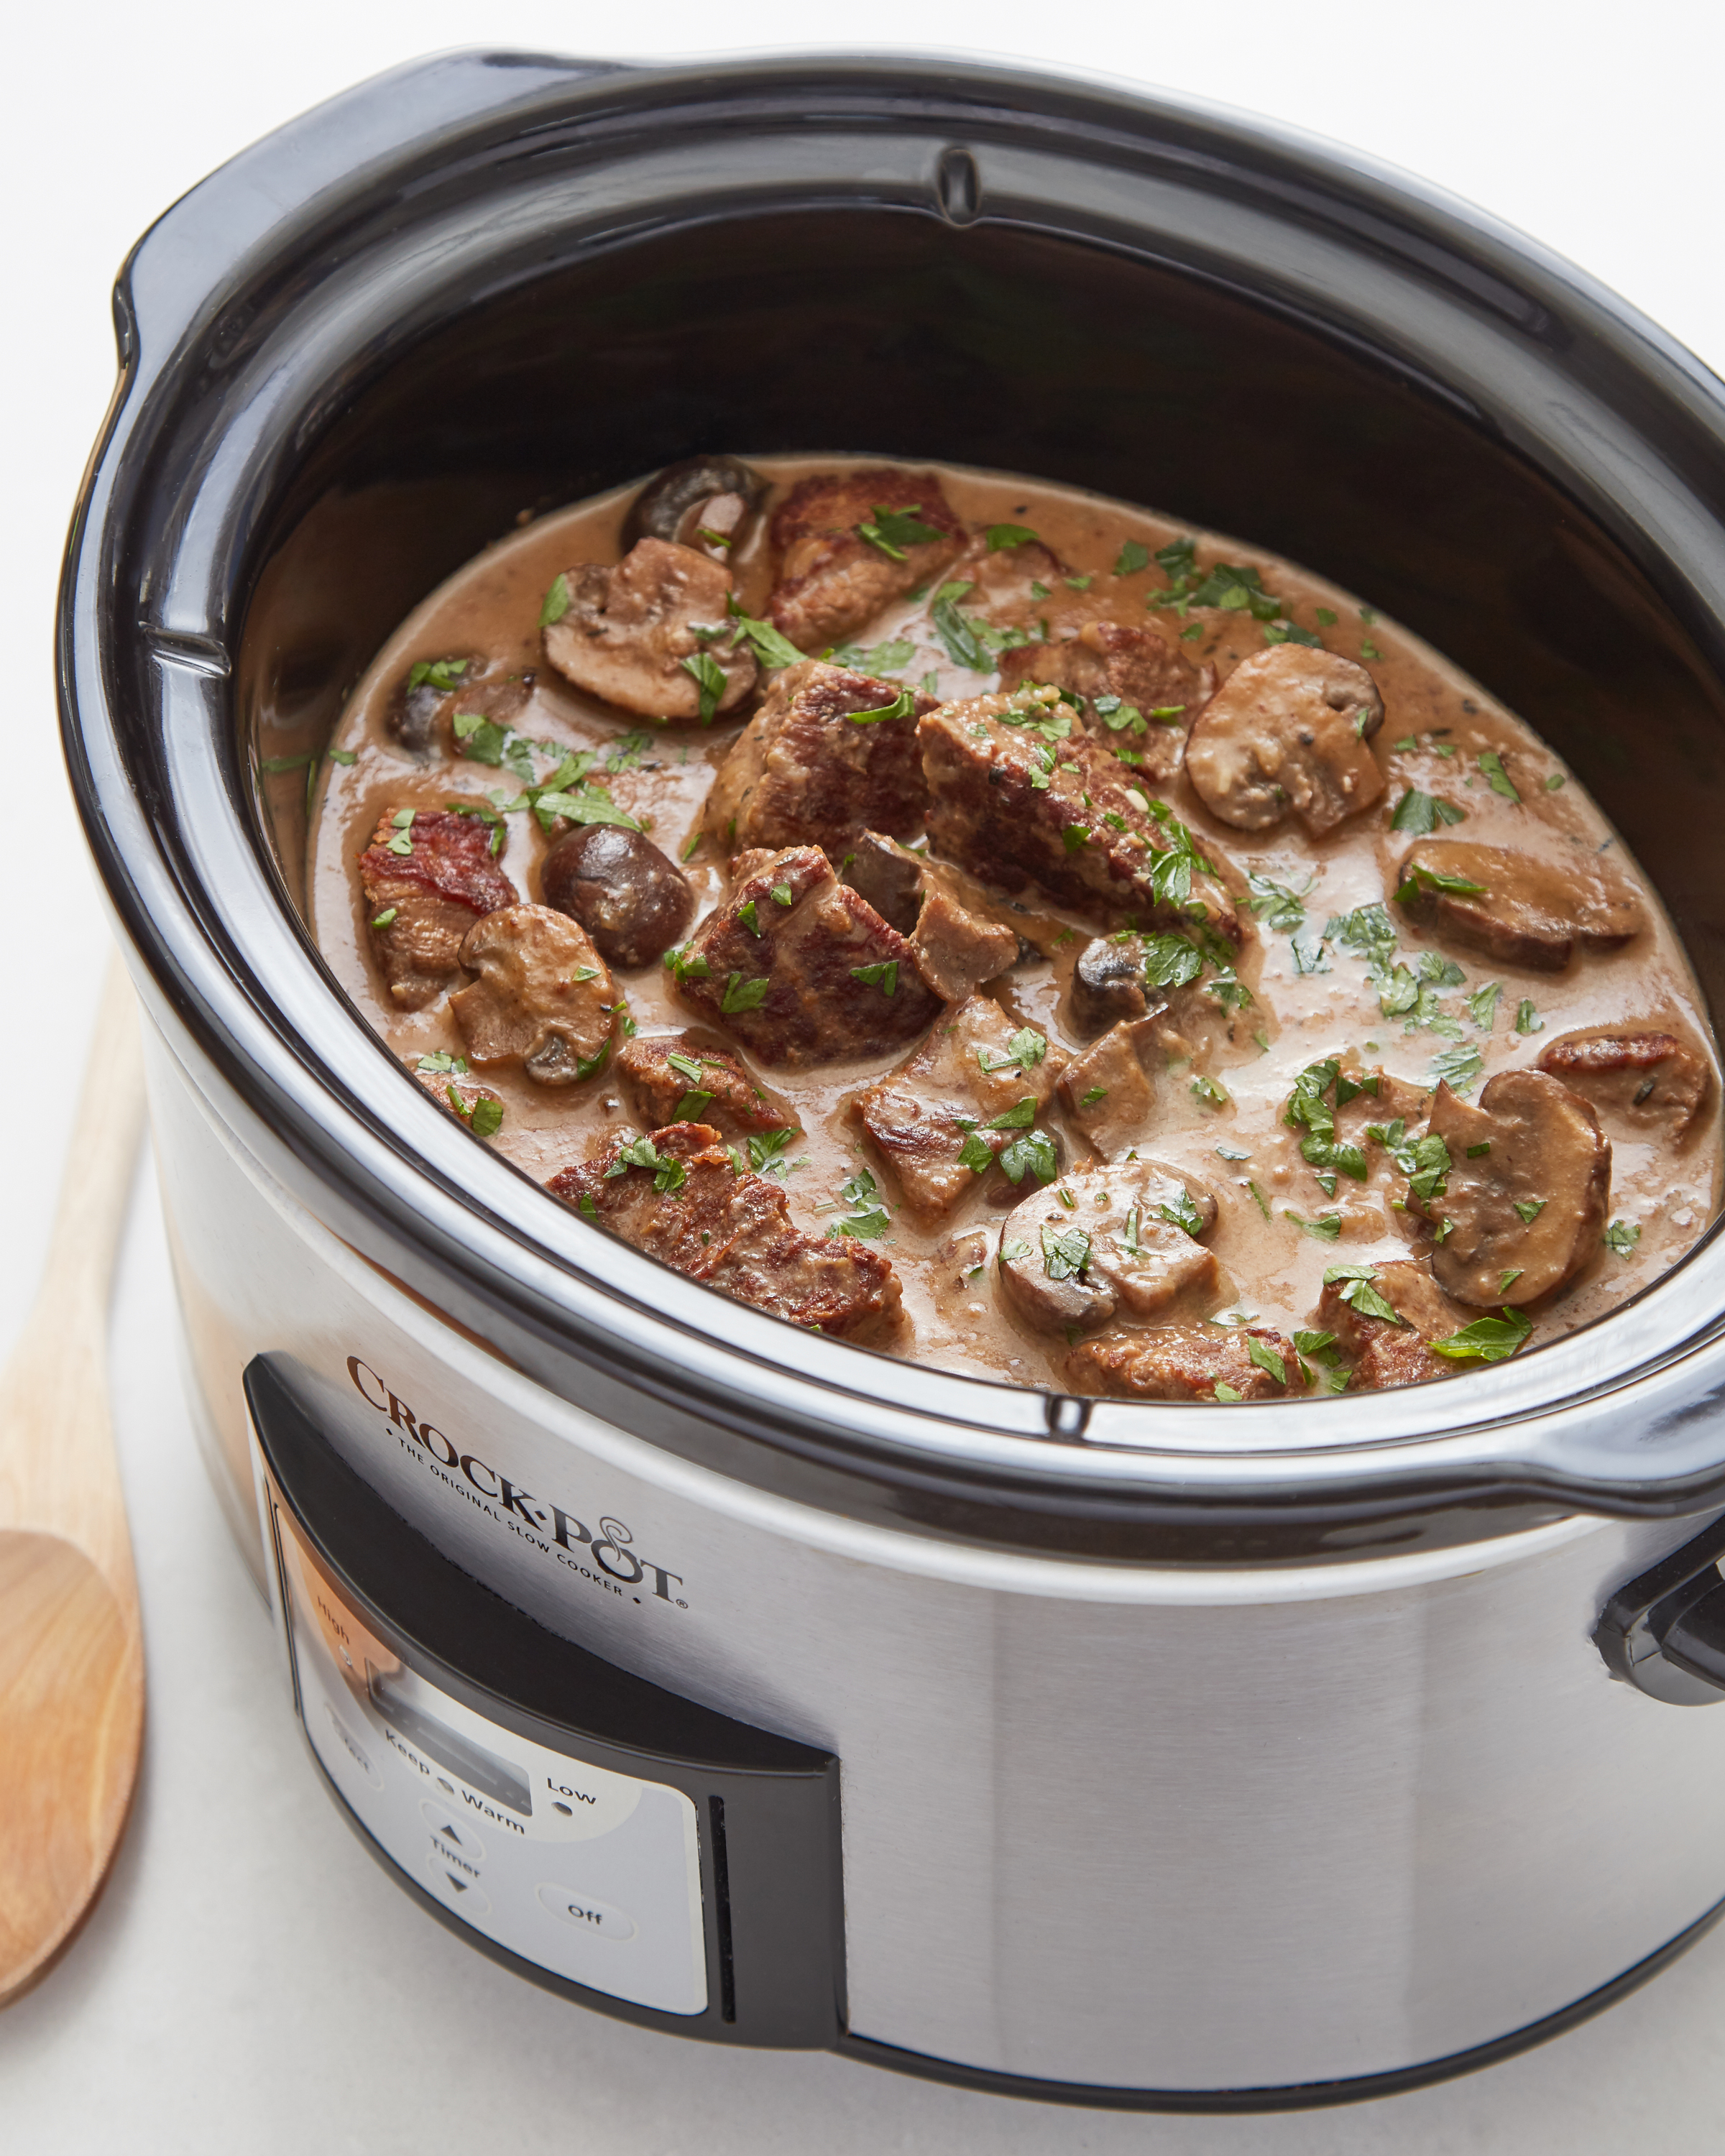
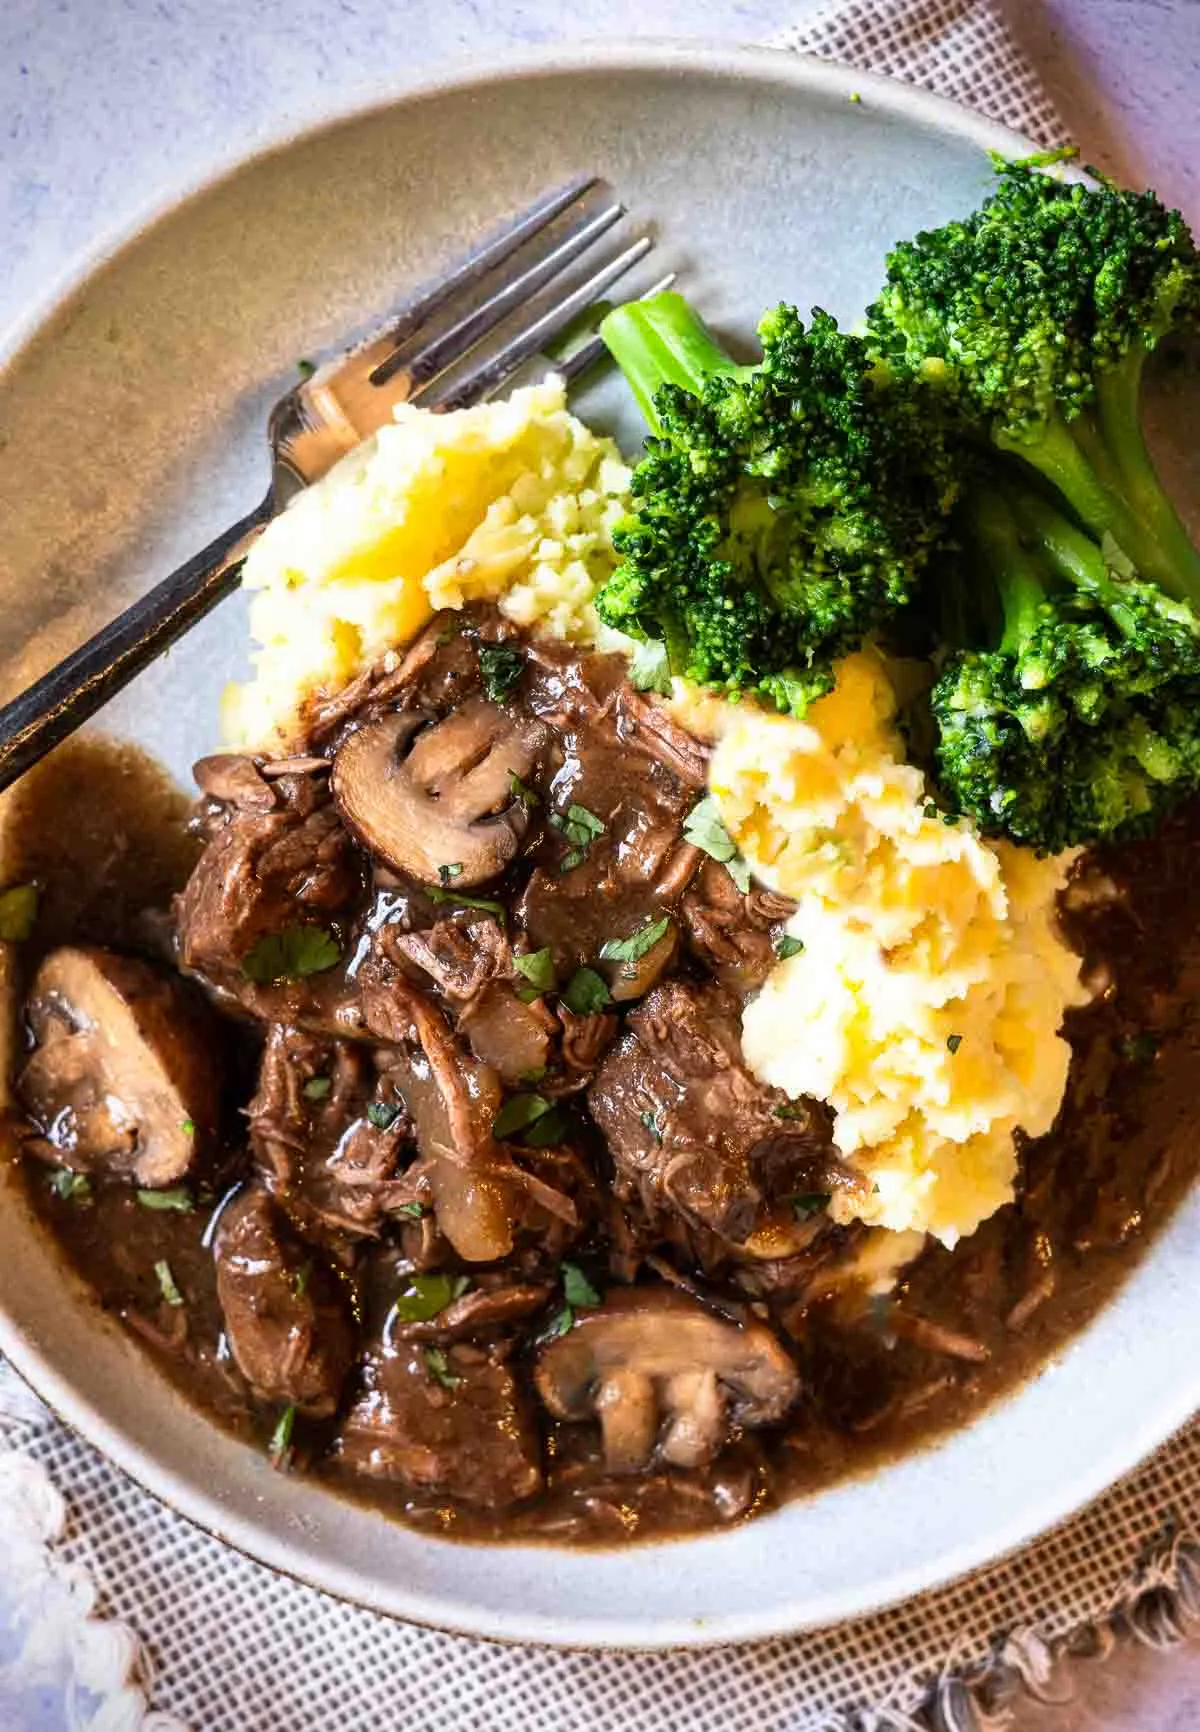
Mushrooms are a toss-up. If you want them to become part of the gravy — soft, savory, indistinct — toss them in at the start. But if you want any structure, hold them back. I like to sear mushrooms separately near the end and stir them in during the last hour. That way they still taste like mushrooms.
Peas, spinach, cream, sour cream, mustard, herbs, or anything delicate? That’s all end-game material. Add them in the last 10–30 minutes. Long heat dulls everything. You’re not slow-cooking freshness — you’re finishing with it.
Now the big one: potatoes. I know people love one-pot meals. I get it. But don’t cook raw potatoes in the same pot as beef tips and gravy. They fall apart, leak starch into the sauce, and make your gravy cloudy and heavy. If you want them in there, parboil them first and stir them in at the very end. Better yet? Cook them on the side. Mashed, roasted, doesn’t matter. Keep the textures separate so they can actually do something on the plate.
And if you’re thinking of adding carrots? Same deal. They go soft fast and add sweetness. That’s not always a bad thing, but it does shift the dish toward stew. Use them only if that’s where you’re headed.
What it comes down to is this: if it breaks down fast, keep it out of the cooker until the beef is close to done. If it needs time, give it time — but cook it right first. Don’t use the slow cooker to do your prep for you.
Next: what to serve this with — and why what goes under the beef matters just as much as the meat itself. Because gravy with nowhere to go is just waste. Let’s build the plate.
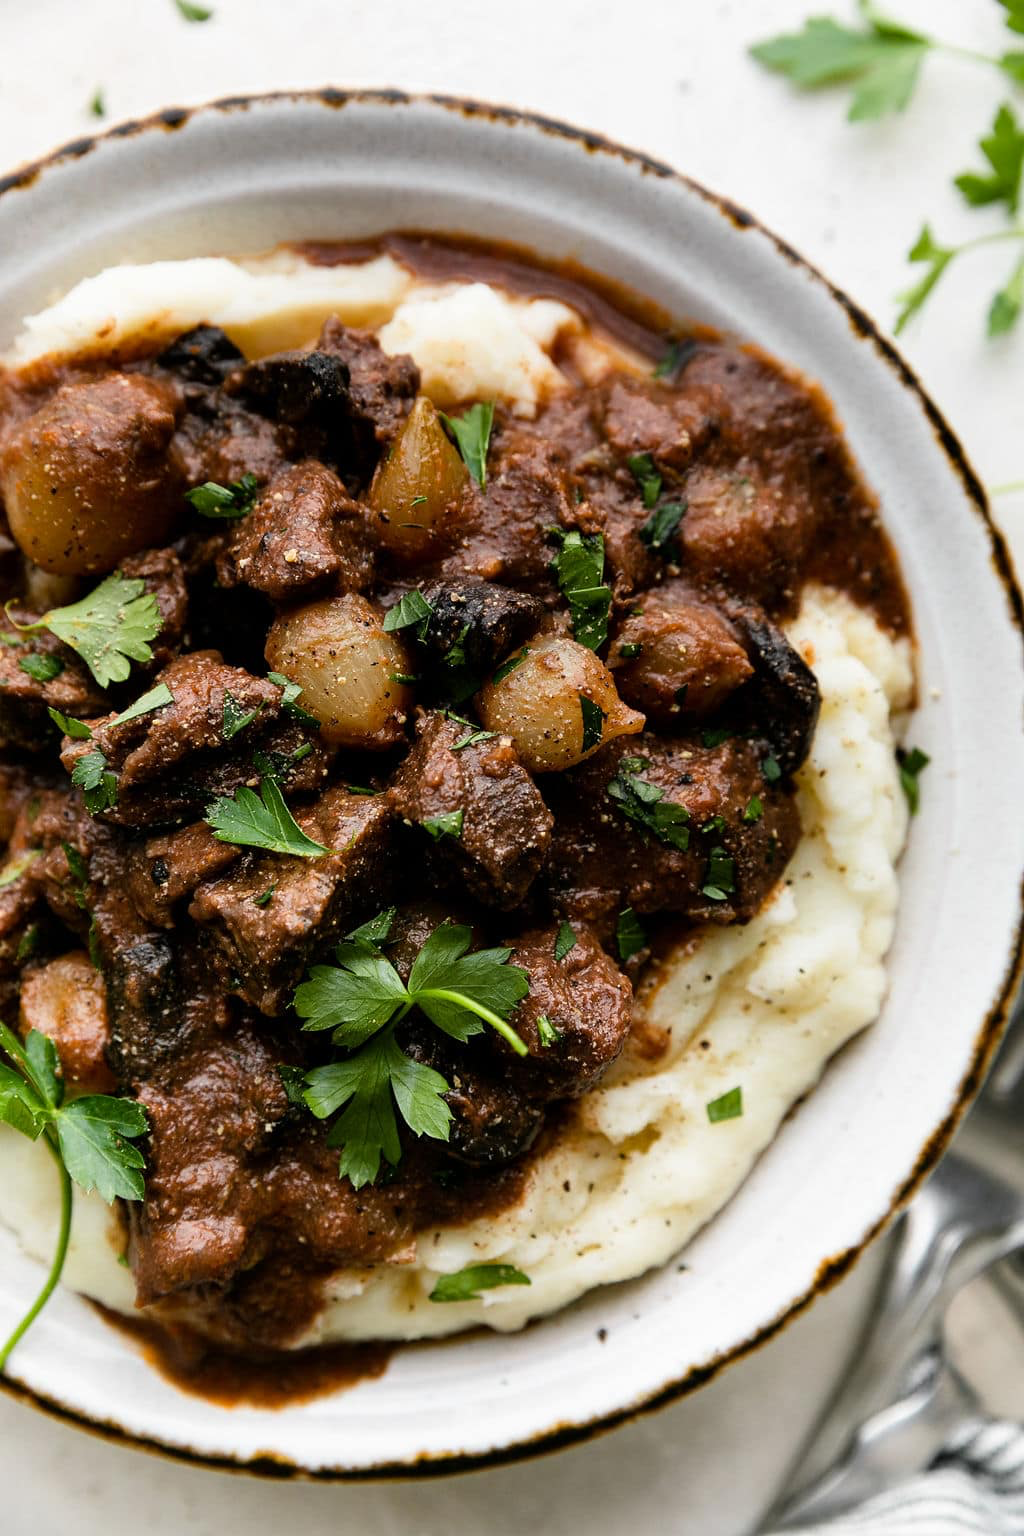
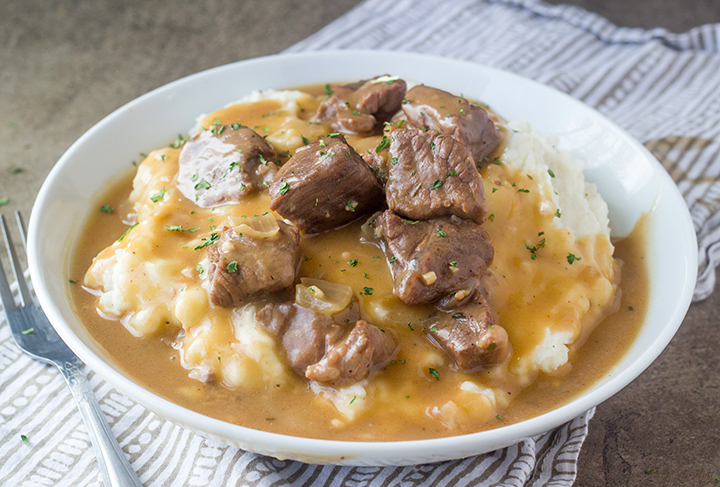
Let’s talk about the plate — the base, the thing that soaks up the gravy and holds everything together. Because slow cooker beef tips without a starch underneath? That’s just beef and broth looking for a purpose.
What to Serve It With (and What Actually Soaks Up the Gravy)
The first time I got beef tips right — I mean really right — the gravy was deep, glossy, full of everything that came off the beef during the cook. And I ruined it by spooning it over plain white rice and calling it dinner. The beef was tender. The sauce was rich. But the rice just sat there, not absorbing anything, not helping. It was ballast. Not part of the bite.
This dish needs a base that doesn’t just carry the meat — it welcomes the gravy.
Mashed potatoes are the classic. Not just because they taste good (they do), but because they give you a cushion. Something soft that holds onto the gravy, stretches the flavor, and makes every bite feel like a full spoonful. They don’t need to be fancy. Just hot, well-salted, and smooth enough to catch what’s poured over them.
Egg noodles are another favorite — especially the wide, curly kind. They tangle with the gravy. They hold the beef. And they make the dish feel like it’s got movement. Just don’t overcook them, and butter them lightly so they don’t go sticky on the plate.
Rice can work — but it has to be the right kind. Sticky, short-grain rice won’t hold the sauce. You want something like jasmine or long-grain white rice, cooked so the grains stay separate. Even better if it’s buttered, salted, and warmed properly before serving.
Some people go with polenta or grits, and that’s a move I’ll back if the gravy’s thin and the beef is on the shredded side. It leans Southern, it’s comforting, and it soaks up flavor like a sponge. But it has to be seasoned. Don’t make beige-on-beige.
If you want crunch or balance, think outside the starch: a vinegar-heavy slaw, some garlicky green beans, or roasted carrots with char on them. Something bright and structured to cut through the weight of the dish — not compete with it.
And if you’re just reheating a container from the fridge and spooning it onto toast with a fried egg on top? Good. That works too. Not everything needs ceremony. But when the gravy’s good, you want to give it somewhere to go.
Next up: what to do with the leftovers — how to store them without ruining the sauce, how to reheat without overcooking the beef, and how to make sure Day Two tastes as good (or better) than Day One. Let’s wrap the cooking.
Storage, Leftovers, and Reheating
There’s a kind of magic that happens when beef tips and gravy sit overnight. The sauce thickens a little. The flavors mellow and deepen. The meat soaks up more of the surrounding flavor. And if you’ve stored it properly, the next day’s meal might even outshine the first.
But you’ve got to store it right. Otherwise, the gravy congeals into something sad and the beef turns to shredded pulp.
First rule: cool it down before you lid it. Let the cooker rest open for twenty minutes or so — just enough for the steam to ease off and the surface heat to drop. You’re not trying to lock in a sauna. You’re trying to keep the beef from stewing itself into mush while it cools.
Once it’s no longer piping hot, transfer the meat and gravy into a shallow container. Not just for space, but for surface area — it cools faster that way. Don’t separate the gravy from the meat. They need each other.
In the fridge, it’ll hold for three to four days. In the freezer, closer to two months. Just freeze it in portions that make sense. Nobody’s happy defrosting four pounds of beef tips when they only wanted one sandwich.
When you reheat, go slow. If it’s from the fridge, warm it in a saucepan with a lid and a splash of water or broth to loosen the gravy. Keep it low and stir gently. Don’t crank the heat — you’re not trying to boil the beef again. You’re waking it up.
Microwave works in a pinch, but only if you stir halfway through and cover it. Otherwise, you’ll get dry beef around the edges and cold spots in the middle. And nobody wants to chew their way through that.
Reheated properly, the gravy melts back to life, the beef stays tender, and suddenly you’ve got a bowl of something that tastes like you planned it this way.
Leftovers aren’t backup. They’re built-in success. Especially if you treat them like food instead of fridge filler.
FAQ — Beef Tips and Gravy, Real Questions
Slow cooker beef tips sound simple — and they are, until the sauce looks thin, the beef still feels tough, or you’re trying to remember if you were supposed to add cornstarch at the start or the end. These are the questions that come up mid-cook, mid-doubt, or mid-oh-no. Here’s how to get through them without derailing dinner.
Can I skip browning the meat?
You can. But the flavor will suffer. Browning builds depth — not just on the beef, but in the gravy. If you’re short on time, brown half. Or even just the outside of a whole roast before cutting it. Anything is better than skipping completely.
Why is my beef still tough after five hours?
It’s not done. If you’re using chuck, give it more time. Don’t crank the heat. Just wait. When it’s ready, it’ll press apart with a fork without falling to shreds. Tough beef isn’t a failure — it’s a dish that needs another hour.
What’s the difference between stew beef and beef tips?
Packaging. They’re usually the same thing: small cuts off larger roasts, mostly chuck. But stew beef is often more uneven in size and quality. If you want consistency, buy a whole chuck roast and cut it yourself.
Can I add cornstarch at the beginning?
No — it breaks down during long cooks and leaves you with a weird, dull sauce. If you need to thicken, do it in the last 30 minutes, or finish it on the stovetop.
What kind of wine is best for the sauce?
Dry reds — cabernet, merlot, even a decent shiraz. Nothing sweet. And only a splash — you’re not braising a pot roast. Just adding depth. Don’t overthink it.
Why does my gravy always taste flat?
Could be a lack of acid (a dash of vinegar or wine helps), could be too much liquid, or not enough seasoning. Could also be that the fond got skipped — that’s where the flavor lives. Always deglaze the pan after browning and add that to the pot.
Can I cook it overnight?
Technically, yes. But only if you trust your cooker not to run hot. Otherwise, you’ll wake up to dry beef and broken gravy. Better to prep everything the night before and start cooking in the morning.
Beef tips and gravy don’t ask for much — just a little time, a little care, and a willingness to check on things once or twice. If something’s off, it’s almost always fixable. If it’s done right, you’ll know — not because the recipe says so, but because the spoon keeps going back in.
Closing: It’s Not Just a Pot of Beef — It’s How You Cook It
There’s nothing flashy about slow cooker beef tips and gravy. It doesn’t rely on technique. It doesn’t call for special ingredients. But it does ask for a little attention — before the lid goes on, and again before the plates come out.
Start with the right cut. Brown it like it matters. Don’t drown it. Don’t rush it. Let it take its time, and it’ll give you back a sauce with real backbone and beef that actually tastes like beef. Serve it over something worth catching the gravy. Eat it hot. Eat it again the next day.
It’s not complicated. But when it’s done right, it’s better than most of the things that are.