Slow Cooker Chicken Parmesan Recipe – Easy, Cheesy, and Full of Flavor

Hi — I’m Chef Marcus.
If you’ve cooked with me before, you know I’m not here to overcomplicate things. I like food that’s honest. Food that fits into real life, not just into glossy photos or three-hour weekend projects. This slow cooker version of Chicken Parmesan checks all those boxes — big on flavor, low on stress, and built to work whether you’re cooking for a crowd or just trying to get through the week with something hot and good on the table.
Glad you’re here — let’s get into it.
- Foreword: The Dish That Surprised Me
- Part One: Chicken Parmesan — What It Is, What It Isn’t
- Part Two: Choosing the Right Chicken
- Part Three: Sauce Matters — Building Flavor in the Slow Cooker
- Part Four: The No-Breading Debate — Rethinking Texture
- Part Five: Layering It Right — What Goes Where, and When
- Part Six: Cheese — Stretch, Melt, Finish
- Part Seven: Crispy Finish? How to Broil for the Classic Look
- Part Eight: What to Serve It With
- Part Nine: Making It Ahead and Meal Prepping
- Part Eleven: Frequently Asked Questions
- Part Twelve: Final Thoughts — A Slower Take on Something Familiar
Foreword: The Dish That Surprised Me
I didn’t set out to reinvent Chicken Parmesan. Honestly, I wasn’t even thinking about it — not until one slow Tuesday when I realized I had a few chicken breasts, a block of mozzarella, and a jar of sauce I’d forgotten was still good. No frying oil. No breadcrumbs. Just enough time, and a slow cooker sitting on the counter, already warm.
Chicken Parmesan — or at least the way most of us learned it — is a dish built on ceremony. You dredge the chicken. You fry it until it’s golden. You spoon sauce over the top and slide it under the broiler with enough cheese to break a spatula. It’s loud. It’s proud. It’s everything Italian-American food should be — layered, saucy, unapologetically cheesy.
But here’s the thing. That version takes time. And cleanup. And a certain kind of energy I don’t always have when I’m cooking for real life instead of a dinner party. What I found that day, by accident more than intention, was something quieter. Slower. But just as satisfying.
I layered the sauce at the bottom. Pressed in the chicken. Covered it gently. Let it go. No flour, no sizzle, no crust to guard. And when I came back hours later, the chicken was soft in that way only slow cooking can pull off. The sauce had darkened. The whole thing smelled like a restaurant kitchen right before the rush. I added the cheese at the end — sharp Parmesan, low-moisture mozzarella — and gave it just enough time to melt before serving.
It wasn’t crispy. It wasn’t flashy. But it was comforting. And maybe more importantly, it worked.
What I learned that day was that Chicken Parmesan doesn’t have to follow every rule to still feel familiar. You don’t need a frying pan to make something rich. You don’t need breading to get satisfaction. And you don’t need to nail some perfect crust to feel like you’ve done the dish justice.
This version gives you time back. It’s the kind of recipe that meets you where you are — whether that’s a slow Sunday or a midweek grind when you just want something warm, filling, and undeniably good.
So no, it’s not traditional. But it is real. It’s made with purpose. And it delivers the heart of Chicken Parmesan in a way that’s softer, slower, and — for more days than not — better suited to the life we’re actually living.
Let’s begin.
Part One: Chicken Parmesan — What It Is, What It Isn’t
Before we start layering sauce and melting cheese, it’s worth stepping back to look at what we’re actually cooking — and what we’re not.
Chicken Parmesan, as most of us know it, isn’t Italian in the old-world sense. It’s Italian-American. A dish born from adaptation — from cooks who came to the States with a love of eggplant parmigiana and started working with what was more available and more affordable. Chicken instead of eggplant. Fried instead of baked. Mozzarella, marinara, a little basil if there was any around. No one called it fusion. It was just dinner. And people loved it.
The traditional version is straightforward, but not exactly simple. You bread cutlets. You fry them until golden. Then you top them with sauce and cheese and bake or broil them until everything melts and bubbles into one layered, indulgent thing. It’s not hard, but it’s involved. And it depends on timing — crisp breading, just the right amount of sauce, cheese that stretches without turning to rubber. When it all lines up, it’s beautiful. But that line-up takes work.
So when people hear “slow cooker Chicken Parmesan,” it usually triggers one of two reactions. Either “that sounds brilliant” or “how can that possibly work?”
The answer is in rethinking the purpose of the dish.
You’re not chasing crunch here. You’re chasing flavor. You’re not building a crust — you’re building warmth, depth, and that slow-simmered feel that can’t be rushed. This version isn’t about recreating the stovetop-to-oven path in a new appliance. It’s about honoring the dish’s core — tomato, garlic, tender chicken, melted cheese — while removing the time pressure that usually comes with it.
When you stop thinking of Chicken Parmesan as a cutlet dish and start seeing it as a layered chicken-and-sauce dish, you open the door to real flexibility. The slow cooker version delivers on the satisfaction, but in a way that feels gentler. Less of a production. More of a comfort.
What it isn’t is a one-to-one replica. You’re not going to get crisp edges or that breadcrumb crunch. You’re not frying. You’re not breading. But what you do get is chicken so tender you can cut it with a spoon, surrounded by sauce that tastes like it’s been slowly simmered on the back of a stove all afternoon. And when you finish it with good cheese at the right moment, you still get that golden, stretchy, flavor-loaded bite — the one that makes this dish what it is.
So this isn’t Chicken Parmesan the way your favorite red-sauce joint makes it. And it doesn’t need to be. It’s Chicken Parmesan for the slow cooker, and it’s built for the kind of days where you want something warm and real without standing over a skillet.
Part Two: Choosing the Right Chicken
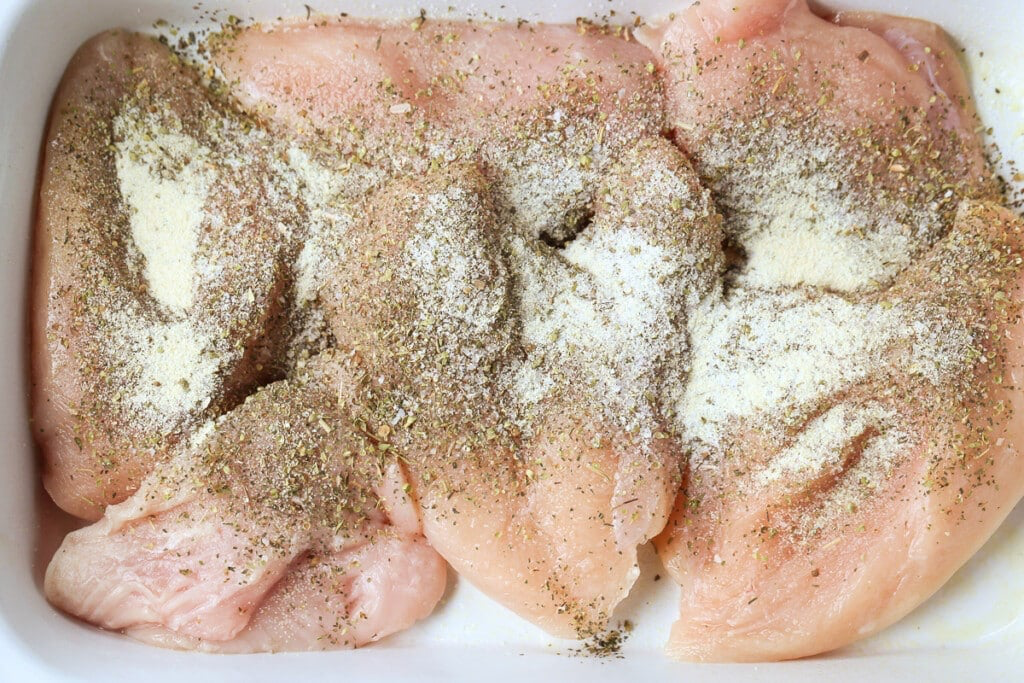
If you want your Chicken Parmesan to come out tender, juicy, and ready to carry sauce and cheese without falling apart or drying out, you have to start with the right cut. Not all chicken behaves the same in a slow cooker — and when you’re skipping breading and high-heat searing, the margin for error gets tighter.
The biggest decision is this: breast or thigh?
Both will work. But they cook differently, they taste different, and depending on how you want the final dish to feel — structured, soft, rich, lean — one might suit you better than the other.
Here’s how it breaks down:
| Cut | Texture After Cooking | Fat Content | Flavor | Best Use Case |
|---|---|---|---|---|
| Boneless Chicken Breast | Firm but prone to dryness if overcooked | Lean | Mild, clean | For a more “classic” presentation with neat slices |
| Boneless Chicken Thigh | Juicier, more forgiving | Higher | Rich, slightly gamey | For melt-in-your-mouth results and deeper flavor |
| Bone-in, Skin-on Thighs | Most tender, deepest flavor | High | Hearty, rustic | When you want ultra-juicy meat and don’t mind a little cleanup |
Boneless Breasts
This is the cut most people think of first, and for good reason. It slices well, presents neatly on the plate, and has a clean, neutral flavor that absorbs sauce beautifully. But it’s also the least forgiving. Left too long in the slow cooker, chicken breasts tend to tighten and dry out — especially if there’s not enough fat in the dish to protect them.
If you’re using breasts, here’s how to get the best result:
- Go thick-cut — thin ones dry out too quickly.
- Keep the sauce level modest so the chicken steams, not stews.
- Don’t overcook — 3.5 to 4 hours on low is often plenty, depending on your slow cooker.
Boneless Thighs
This is my personal go-to. Thighs are naturally higher in fat and connective tissue, which means they break down gently over time and stay moist — even if you accidentally run a little long on the cook time. They shred if you want them to, but also hold together if you’d rather slice or serve whole. They don’t dry out. And they add a depth of flavor that works incredibly well with tomato-based sauces and strong cheese.
The only trade-off? Slightly less “clean” plating. You might have to trim a bit of fat. But the payoff in taste is absolutely worth it.
Bone-In Thighs (Skin Removed Before Cooking)
If you want maximum flavor and you don’t mind doing a little extra work after cooking, bone-in thighs are unbeatable. The bone adds richness to the sauce, and the meat cooks up incredibly tender. Just be ready to fish out the bones before serving — especially if you’re planning to plate it over pasta or serve to kids. Removing the skin beforehand helps keep the sauce from turning greasy.
A Quick Word on Searing
You might be wondering if it’s worth searing the chicken before it goes into the slow cooker. The answer? Sometimes.
If you’re using thighs and you’re after maximum flavor, a quick sear (just a minute or two per side in a hot skillet) can add a bit of that golden-brown depth that the slow cooker won’t provide on its own. It’s not necessary — especially if you’re planning to finish the dish under the broiler later — but it can elevate the overall taste and texture.
For breasts, searing is less important. Since the cut is so lean, you’re better off saving your effort for careful seasoning and moisture control.
Part Three: Sauce Matters — Building Flavor in the Slow Cooker
A good sauce makes everything else easier. It carries flavor. It softens the meat. It gives the cheese something to melt into. And when you’re working with a slow cooker — where you won’t be sautéing or reducing on the fly — your sauce has to be set up to deliver right from the start.
You’ve got two choices here: homemade or jarred. Both can work. It just depends on how much time and control you want.
If you’re going the store-bought route, look for something without added sugar, with a short ingredient list, and ideally with some backbone — garlic, onion, herbs, olive oil. You’re looking for depth. Not sweetness. Not acidity on its own. And definitely not anything watery.
But if you’ve got a few minutes and a saucepan, it’s worth building your own. Not because it’s fancy, but because you can build the layers you want.
Here’s a simple starter base:
- 1 can (14–15 oz) crushed or whole peeled tomatoes
- 1 small yellow onion, finely chopped or grated
- 3–4 cloves of garlic, minced or smashed
- 1 tbsp tomato paste (for richness and color)
- 1 tsp dried oregano
- ½ tsp red pepper flakes (optional, but it adds dimension)
- Salt and pepper, to taste
- A drizzle of olive oil — just enough to carry the aromatics
You can build this right in the slow cooker, but if you want to deepen it even more, sauté the garlic and onion first in a bit of oil before adding the rest. It’s a small step that brings a lot of return.
Let’s break it down further:
Tomato Type: Crushed vs Whole
Crushed tomatoes give you a smoother, more consistent base. Whole tomatoes have more body but require a bit of mashing to break them up. Either one works — just avoid watery diced tomatoes unless you’re planning to reduce the liquid later (which most people won’t do in a slow cooker).
Tomato Paste: Don’t Skip It
This is your secret weapon. Tomato paste adds umami, thickness, and that slow-cooked tomato flavor — even when you’re not simmering all day on the stove. Stir it in before adding the meat. If you’re really after depth, toast the paste in oil for a minute before adding anything else.
Aromatics: Garlic, Onion, and Herbs
Minced garlic and finely chopped onion soften over time and build the backbone of your sauce. Dried oregano holds up better than fresh in the slow cooker, and a pinch of thyme or a bay leaf can add subtle complexity. Red pepper flakes are optional — but a little heat rounds out the sweetness of the tomato without making the sauce spicy.
When to Add the Basil
Fresh basil is best at the end. Drop in a few torn leaves just before serving, once the cheese is melted and the cooker’s off. If you add it early, it’ll darken and lose that bright, peppery aroma. Dried basil works in a pinch — just go light.
Sauce Volume: How Much Is Too Much?
For 2 to 2.5 pounds of chicken, about 2 cups of sauce is the sweet spot. Enough to cover the bottom and nestle the chicken without drowning it. The slow cooker doesn’t reduce — so if you overdo it, you’ll end up with a watery finish.
If you’re unsure, start light. You can always spoon more sauce on top before serving.
A great sauce doesn’t just flavor the dish — it defines it. And when you’re slow-cooking Chicken Parmesan, it’s your best insurance policy against blandness, dryness, or one-note texture. Build it well, and the rest of the dish follows.
Part Four: The No-Breading Debate — Rethinking Texture
If you’ve ever had classic Chicken Parmesan, you know how central the breading is. It’s the crunch. The carrier. The reason the sauce doesn’t soak straight into the meat. It’s also the part that feels the most impossible to replicate in a slow cooker — because, frankly, you can’t.
Once you seal the lid and walk away, you’re committing to a moist environment. That heat, that steam — it’s what makes the chicken tender, but it’s also what destroys any shot at crispiness. Breading in that environment turns to mush. Every time.
Which means you’ve got two choices: either let go of the crunch and embrace the melt-in-your-mouth comfort of a slow-cooked version, or take a hybrid approach — skip the breading in the cooker, but add something crispy right before serving. Either one works. It just depends on what you’re after.
Why Skipping Breading Works
When you take out the breading, you’re also taking out the oil, the extra steps, and a layer that was mostly there to protect the meat from the pan. But in the slow cooker, you don’t need that protection. The chicken stays moist on its own, surrounded by sauce, softened slowly from the outside in.
And without the breading soaking up sauce and adding bulk, the whole dish tastes cleaner. You get more tomato. More chicken. More direct flavor without the sponge of crumbs in between. The cheese becomes the star of the finish instead of just the topping. You’re tasting each layer more clearly.
For a lot of people — especially anyone skipping carbs or gluten — it’s a win across the board.
But What If You Miss the Crunch?
There’s nothing wrong with wanting a little texture. If you’re craving that golden edge, you’ve got options:
- Breadcrumb topping at the end: Toast some seasoned breadcrumbs in butter or olive oil on the stove. Right before serving, sprinkle them over the top of the dish and slide everything under the broiler for a couple of minutes. You’ll get a crispy, golden finish without having to coat the chicken itself.
- Almond flour or pork rind “crust”: Want a low-carb workaround? Mix crushed pork rinds or seasoned almond flour with Parmesan, press it onto the chicken after slow cooking, and broil just until browned. You won’t get full crunch, but you’ll get something close — a textured, flavorful top layer that contrasts beautifully with the soft chicken and sauce.
- Air fryer sidecar: If you’re working with a hybrid kitchen, try this — slow cook the chicken in the sauce as usual, then transfer just the chicken (minus sauce) to an air fryer for a few minutes to crisp up the top. Then return it to the sauce, add cheese, and broil if needed. Not essential, but for die-hard texture seekers, it scratches the itch.
Ultimately, the goal isn’t to recreate a crust that won’t survive in the cooker. It’s to rethink the role of texture — to find new ways to bring contrast into a dish that’s all about melt and comfort.
And once you stop expecting the classic crunch, you start appreciating the tenderness. You lean into the stretch of the cheese, the richness of the sauce, the depth of the chicken — and you realize that what you’ve made might not be crispy Chicken Parmesan, but it’s still really, really good.
Part Five: Layering It Right — What Goes Where, and When
In a dish like this, layering matters. You’re not just throwing ingredients into a pot and crossing your fingers. You’re building a structure — one that protects the chicken, steeps it in flavor, and keeps the cheese from turning into a stringy mess before its time.
Slow cookers don’t stir, reduce, or evaporate the way a stovetop does. So everything you place — and when you place it — has a ripple effect. The sauce can thin out. The chicken can overcook on the bottom and undercook on top. The cheese can disappear before the meat is even done.
Here’s how to build it right from the start.
1. Sauce Goes First
You always want a layer of sauce on the bottom of the slow cooker. Not a full pour — just enough to coat the base. This does two things:
- It prevents the chicken from sticking or scorching during the first hour of cooking.
- It starts infusing flavor from underneath, gently braising the meat instead of boiling it.
If you skip this step and place the chicken directly onto the pot, you’ll often end up with overcooked bottom pieces and dry spots. Sauce on the bottom solves that.
2. Chicken Goes in Next — Nestled, Not Stacked
Lay your chicken pieces directly into the sauce, in a single layer if you can manage it. They don’t need to be completely covered — just slightly tucked into the sauce. Don’t stack them high or jam them in. More layering = more uneven cooking.
If you’re cooking for a crowd and need to stack a second layer, spoon a little extra sauce between each piece to keep things moist and help distribute flavor.
3. Sauce Over the Top — Gently
Once the chicken is in place, spoon more sauce over the top. You don’t want to drown the whole dish. About half to three-quarters of the chicken should be covered. Remember: the slow cooker traps moisture. Too much sauce at the start = watery finish later. You want enough to create steam and infuse the meat, not enough to submerge it.
Use the back of your spoon to tuck the sauce around the sides so everything gets an even hit of tomato and seasoning without overloading the top.
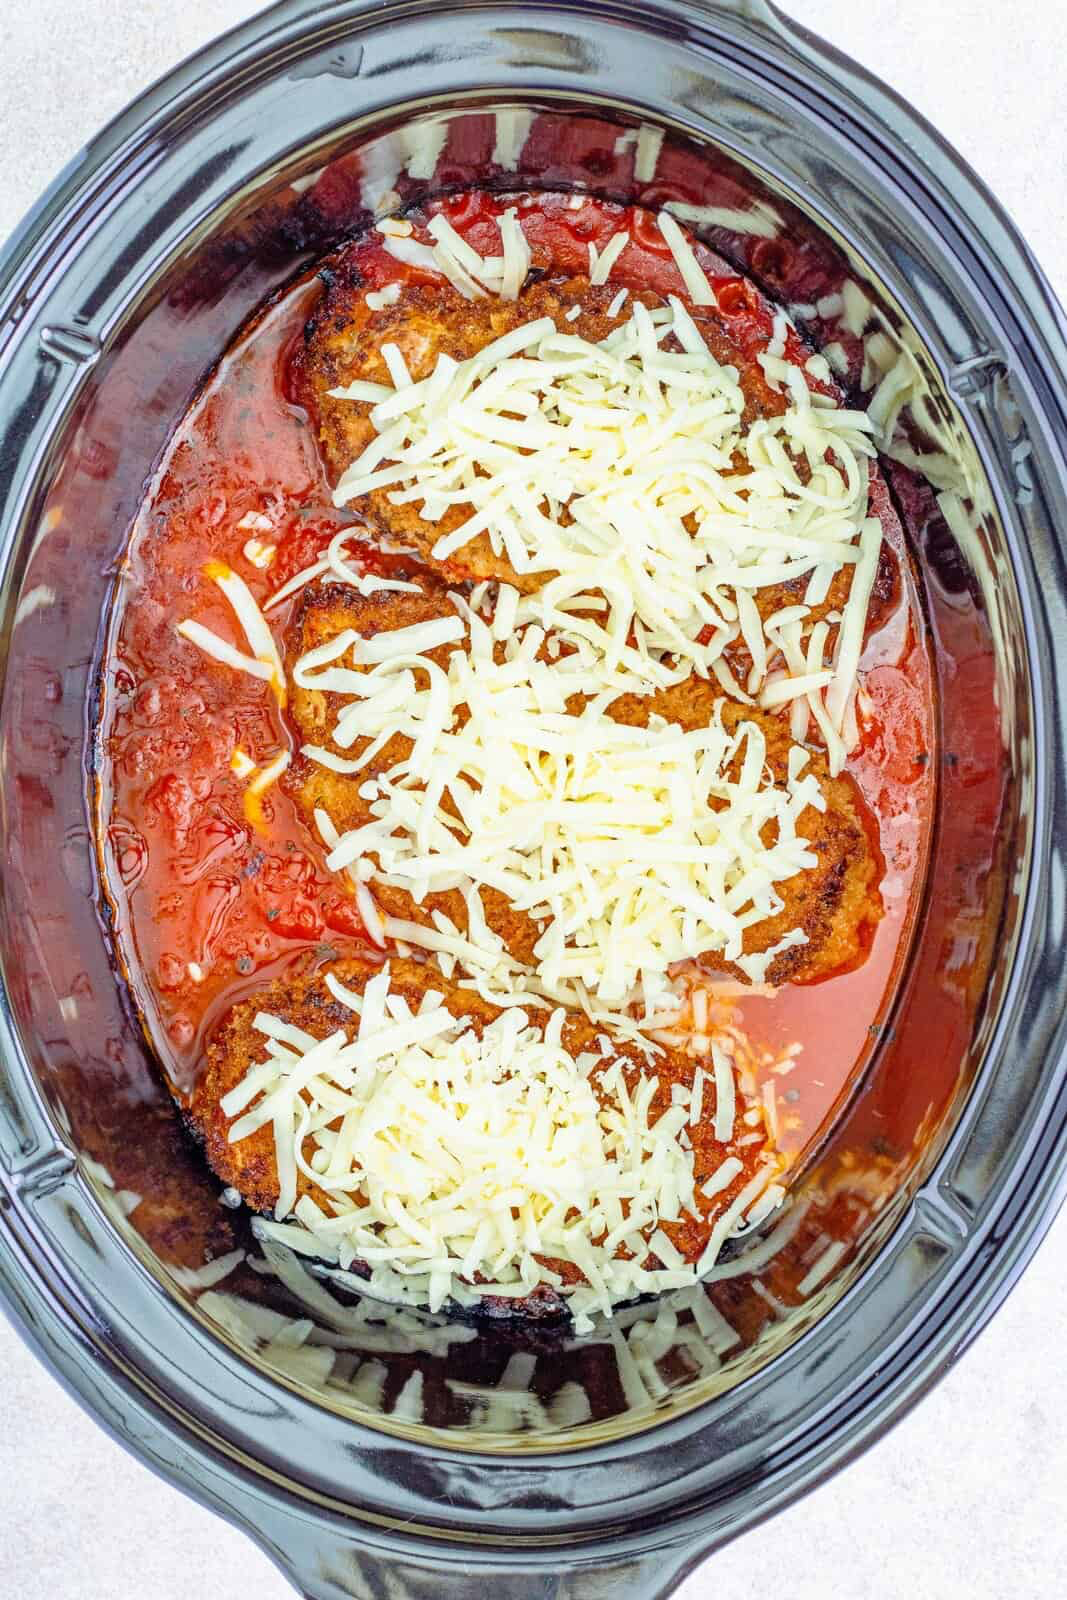
4. Cheese Comes Later
This is important. Don’t add the cheese at the beginning.
Mozzarella — especially fresh or shredded — will break down, separate, or turn rubbery if it’s cooked for too long. Parmesan loses its punch. You end up with a melted mess that used to be cheese.
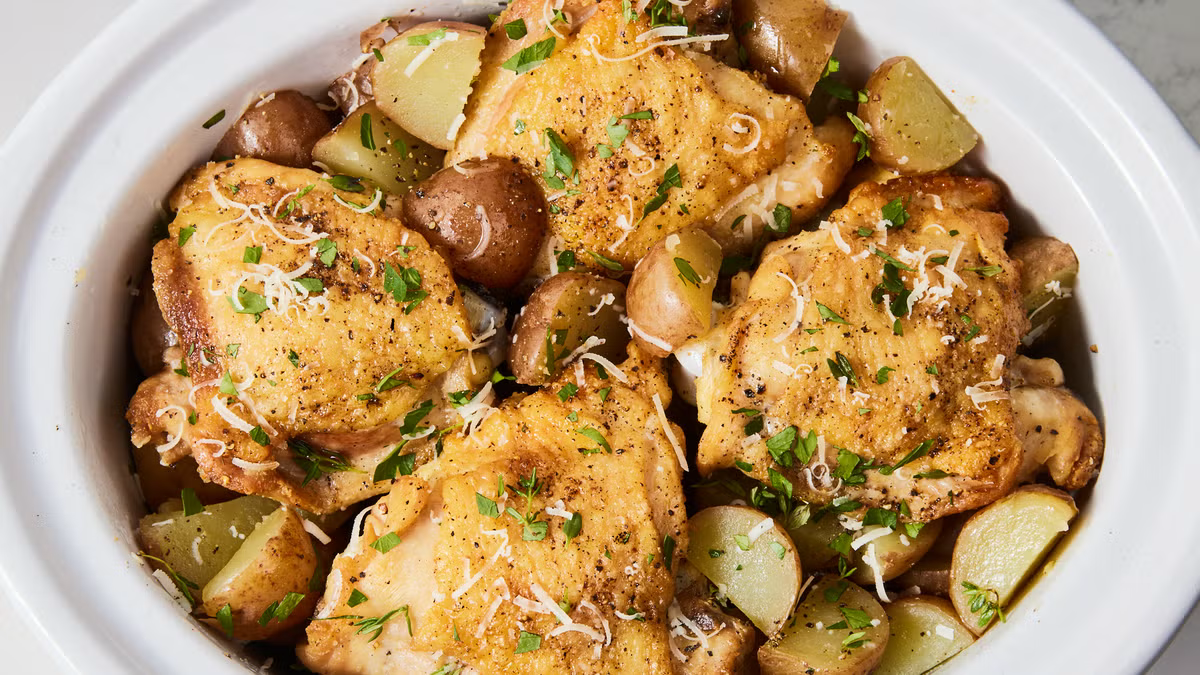
Instead, wait. Add your mozzarella and grated Parmesan during the final 15–30 minutes of cooking. That gives it just enough time to melt fully, soak up some of the tomato flavor, and form that beautiful gooey layer without getting stringy or disappearing.
If you’re finishing the dish under a broiler (more on that soon), you can even hold the cheese until after cooking, then melt and brown it in the oven for a more traditional Chicken Parmesan finish.
Timing Snapshot: The Build
| Step | When | Why |
|---|---|---|
| Sauce (base) | First | Prevents sticking, starts flavor infusion |
| Chicken | Layered after sauce | Keeps things even and moist |
| Sauce (top) | Just after chicken | Flavors the top, avoids over-saturation |
| Cheese | Final 15–30 minutes | Prevents overcooking or breaking |
When you get the layering right, the dish practically builds itself from there. The sauce deepens. The chicken stays moist but structured. The cheese finishes strong. You don’t need stirring. You don’t need rescue moves halfway through. It just works.
And that’s the whole point — set it up with care, and then walk away knowing dinner’s not just cooking… it’s coming together.
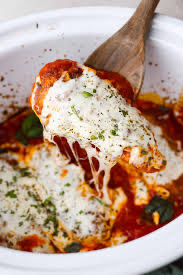
Part Six: Cheese — Stretch, Melt, Finish
Cheese is the last thing that goes on, but it’s the first thing people notice. It’s the moment. The stretch, the melt, the golden finish bubbling around the edges of a spoonful of tomato-soaked chicken. And in a dish like this, it’s easy to overdo it or mistime it and lose the effect entirely.
In the oven, you’ve got more control — short, high heat melts and browns the cheese in minutes. But in the slow cooker, it’s different. The heat is soft. The moisture’s high. And if you throw cheese into that environment too early, it doesn’t melt — it breaks. You lose the texture. You lose the flavor. You get stringy pools and greasy corners, and suddenly your finish feels more like cleanup than comfort.
So here’s how to get it right — both in what you use and how you use it.
What Cheese Works Best
There’s a lot of flexibility here, but some cheeses hold up better than others under slow cooker conditions.
| Cheese | Texture When Melted | Best Use Case |
|---|---|---|
| Low-Moisture Mozzarella | Smooth, stretchy, clean melt | Classic melt without too much water |
| Fresh Mozzarella | Creamy, soft, less structured | Great flavor, but more moisture |
| Shredded Mozzarella | Convenient, but can get oily if overcooked | Add at the end and don’t overdo it |
| Parmesan (grated) | Salty, sharp, slightly crisp when broiled | Layer with mozzarella or sprinkle on top |
| Provolone | Tangy, melts evenly | Optional swap for a stronger cheese note |
If you want that classic stretch — the kind that clings to a fork and pulls — go with low-moisture mozzarella. The kind you’d find pre-shredded or sold in firm blocks. It melts cleanly without releasing too much water into the dish. That matters, especially when you’re already dealing with a sauce-heavy environment.
Parmesan, meanwhile, doesn’t melt the same way — but that’s not its job. It brings the salt. The nuttiness. The umami finish that sharpens everything else. Use it as a layer over the mozzarella or sprinkled in just before serving. A little goes a long way.
Fresh mozzarella can work if you’re finishing the dish under a broiler, but it’s not ideal for long exposure in the slow cooker — it tends to release more water and soften into something closer to cheese soup.
When to Add the Cheese
The timing here is everything. You want to add your cheese at the very end of cooking — ideally within the last 15–30 minutes. You’re not trying to cook the cheese. You’re trying to melt it into the dish.
Leave the lid on so the trapped heat can do the work. Don’t stir it in — just layer it gently on top. It’ll soften, stretch, and settle over the chicken without breaking into oil.
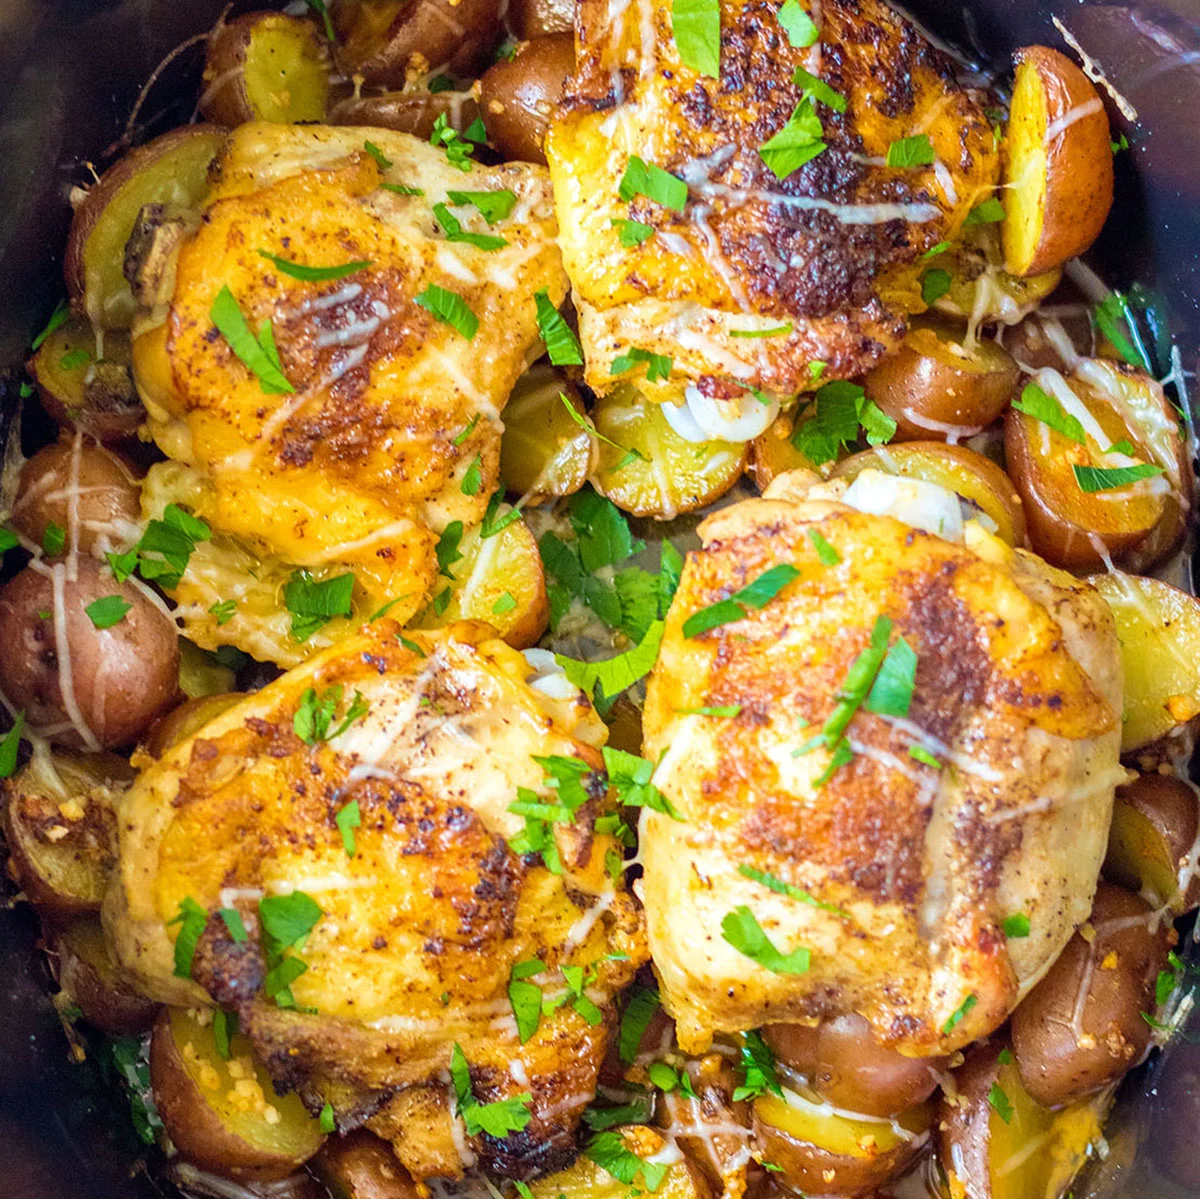
If you want that classic bubbly, browned top, transfer the finished dish (or individual servings) to an oven-safe dish, top with cheese, and slide it under the broiler for 2–3 minutes. That’s how you get the golden finish without sacrificing the gentle tenderness of the slow-cooked meat underneath.
Building a Cheese Layer That Actually Holds
- Don’t overdo it. Too much cheese weighs the dish down and makes it harder to portion.
- Use a mix. Mozzarella for melt, Parmesan for flavor. If you like a bit of sharpness, a little provolone or even fontina can layer in without taking over.
- Finish fresh. A final sprinkle of grated Parmesan or a few torn basil leaves just before serving adds color, aroma, and the last nudge of flavor.
When done right, the cheese isn’t just a topping. It’s the finish line. The part that ties the dish together and reminds you that even without breading, even without frying, this is still Chicken Parmesan — just slower, deeper, and somehow better than you expected.
Next in Part Seven, we’ll talk about finishing — when and how to broil, whether to crisp up the top, and what to do if you’re chasing that “oven-baked” effect without ever turning one on. Say the word, and I’ll roll it out.
Part Seven: Crispy Finish? How to Broil for the Classic Look
One of the first things people miss when they skip the oven version of Chicken Parmesan is the finish. That moment when the cheese bubbles and browns. The corners get crisp. The top turns golden and just a little bit sharp around the edges.
The slow cooker can do a lot, but it won’t give you that. The heat’s too soft. The moisture’s too high. The cheese will melt — beautifully, if you time it right — but it won’t toast, and it definitely won’t crisp. Which is fine most of the time. The slow-cooked version has its own strengths: tenderness, flavor, depth. But if you want that traditional visual (and textural) finish, it’s easy to add with a few minutes under the broiler.
This is where slow cooking and quick high-heat cooking can work together — no contradiction, just smart sequencing.
When to Transfer to the Broiler
You have two solid options here:
- After slow cooking is complete, cheese already added
If you’ve added your cheese in the last 20–30 minutes of slow cooking, it’ll be fully melted but pale on top. You can lift the chicken and sauce into an oven-safe dish — ceramic or cast iron works great — and slide it under the broiler for 2–3 minutes until the cheese starts to blister and brown. - Skip the slow cooker cheese step, broil from scratch
If you prefer more control, hold off on the cheese completely during slow cooking. Once the chicken is done, transfer it to a dish, spoon sauce over the top, add your mozzarella and Parmesan fresh, then broil from cold. The cheese will melt and brown all in one go — and you’ll have perfect edges without any chance of overcooking in the slow cooker.
In both cases, keep a close eye. Broilers move fast. You’re not walking away for a podcast break here — you’re standing by, waiting for the top to tell you it’s time.
Optional: Add a Breadcrumb Topping
If you really want to push the crust factor, you can make a quick stovetop breadcrumb mix to scatter on top before broiling. Think of it as the crispy outer layer Chicken Parmesan usually gets from frying — only now it’s just a 3-minute skillet job.
Try this:
- ½ cup panko (or almond flour for low-carb)
- 1 tablespoon olive oil or butter
- 1 tablespoon grated Parmesan
- Pinch of garlic powder and black pepper
Toast it all in a skillet until golden, then scatter it over the cheese before the broiler. It’ll toast in seconds and give you a crunch that bridges the gap between the slow cooker and the original fried version.
Can You Use an Air Fryer Instead?
Sort of — but only if your servings are small. You can absolutely pop individual chicken portions into the air fryer for a few minutes to crisp up the cheese and edges. Just keep in mind: it’ll work best if you’ve let the chicken cool slightly first so it doesn’t fall apart as you move it.
If you’re cooking for one or two and want a quick crisp without turning on the oven, it’s a good workaround. Just lower the temperature slightly (around 375°F) and check often.
When the Finish Isn’t Necessary
Honestly? You can skip the broiler entirely and still have a dish that’s deeply satisfying. The slow-cooked cheese will melt, the sauce will thicken, and the whole thing will spoon like comfort food should. The broil is optional. But if you’re cooking to impress — or just really want that golden lift — it’s worth the extra two minutes.
Because when the top is bubbling and the edges are just a little toasted, it stops being “slow cooker good” and just becomes good. Period.
Part Eight: What to Serve It With
Once the chicken’s tender, the cheese is melted, and the sauce is doing everything it should, the only real question left is: what goes next to it on the plate?
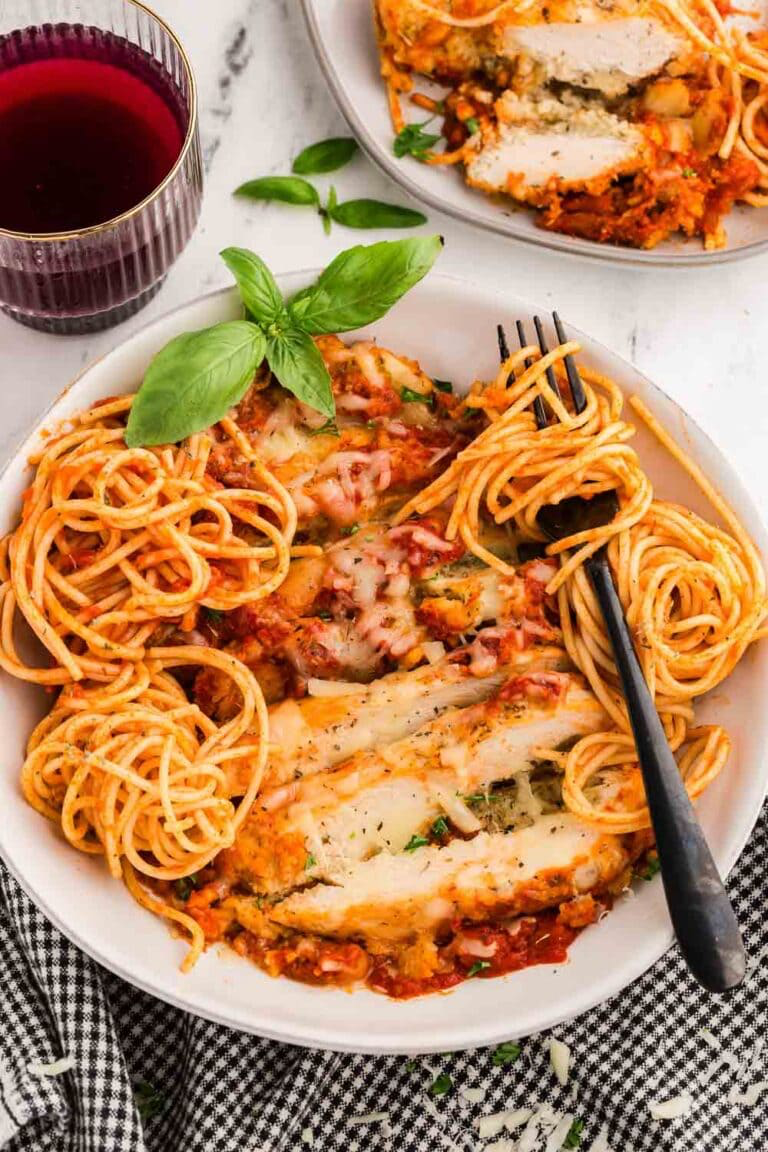
The instinct, of course, is pasta. Chicken Parmesan and spaghetti have been inseparable in restaurant menus and home kitchens for decades. And yes, it works. Twirl a fork through some linguine or penne, drag it through the sauce, pull a bit of melted cheese along for the ride — it’s the classic move for a reason.
But here’s the thing: this slow cooker version doesn’t need pasta to feel complete. In fact, because the chicken is so tender and the sauce so generous, you have room to steer the meal in different directions — lighter, lower carb, more varied in texture, or just more interesting than another bowl of noodles.
If you want comfort? Go creamy.
A mound of mashed potatoes or buttery mashed cauliflower soaks up the sauce in all the right ways. The starch (or faux-starch) gives the plate a grounding that makes the whole meal feel settled. If you’re leaning keto or just trying to lighten things up, the cauliflower option pulls its weight — especially with a little roasted garlic and Parmesan folded in.
If you want balance? Go green.
Sautéed spinach, steamed broccoli, grilled zucchini — something with color, texture, and a little freshness helps offset the weight of the cheese and tomato. Even a lightly dressed arugula salad on the side gives the plate lift and makes the chicken feel brighter by contrast. It’s not garnish — it’s balance.
If you want structure? Build a bowl.
You can layer this dish into something new entirely by turning it into a grain or veg bowl. Start with a base — farro, rice, cauliflower rice, or roasted sweet potatoes. Add a spoonful of sauce, the chicken, and cheese, then top with something sharp: pickled onions, fresh herbs, a squeeze of lemon. Suddenly it’s not just a dinner plate — it’s a full, composed dish that hits every angle.
If you’re feeding kids? Go rustic.
Garlic bread, roasted potato wedges, or simple buttered noodles will always have a place. Not everything needs to be a reinvented version of itself. Sometimes, the win is just getting everyone around the table with something warm, familiar, and filling in front of them. Chicken Parmesan does that with very little help.
One Dish, Multiple Directions
You’re not locked into any one version here. That’s what makes this recipe so flexible — the base is strong enough to hold its own, and the sides are just an extension of what kind of meal you want it to be.
If it’s a comfort night? Go rich and soft.
If it’s a midweek meal? Keep it light and quick.
If it’s leftovers the next day? Pile it onto toast, stuff it into a wrap, or chop it into a salad and call it something new.
However you serve it, the sauce will hold. The cheese will carry. The chicken will speak for itself.
Part Nine: Making It Ahead and Meal Prepping
One of the best things about this version of Chicken Parmesan is that it holds up. Not just for a few hours. For days. You can make it ahead, reheat it without wrecking it, and even freeze portions if you’re thinking beyond the week. It’s meal prep that doesn’t feel like meal prep — the kind that actually gets better the second day and doesn’t punish you for not eating it immediately.
But there’s a little strategy involved. You want the chicken to stay tender, the cheese to stay smooth, and the sauce to stay bold without getting watery or dull.
Here’s how to pull it off.
Storing the Finished Dish
Once the slow cooker’s off and the dish has cooled slightly, portion the chicken into airtight containers. Spoon enough sauce over each piece to keep it moist, but not so much that it drowns. If you’ve already added cheese, let it cool fully before sealing — hot, steamy cheese in a closed container just turns rubbery.
If you’re planning to eat it within 3–4 days, store it in the fridge. Otherwise, freeze it.
Fridge Shelf Life: 4–5 days
Freezer Shelf Life: Up to 3 months (best texture if used within 6–8 weeks)
If freezing, wrap portions tightly or use a vacuum-seal bag. Label them — because in two weeks, every red sauce container in the freezer will look exactly the same.
Reheating Without Ruining It
Reheating is where things can go sideways if you’re not careful. Chicken can toughen. Cheese can separate. Sauce can dry out at the edges while the center’s still cold.
To avoid that:
- Stovetop (best method): Place chicken and sauce in a covered pan over medium-low heat with a splash of water or broth. Let it warm slowly until heated through. Add a little extra cheese at the end if needed.
- Oven (for larger portions): Cover loosely with foil and bake at 325°F (160°C) until warmed through, 15–20 minutes. Uncover for the last 5 minutes to refresh the top.
- Microwave (if you must): Use medium power in short bursts. Cover with a damp paper towel. Stir the sauce halfway through and check often to avoid overheating.
If you’re freezing it, thaw in the fridge overnight before reheating. Trying to heat straight from frozen usually results in overcooked edges and icy centers — no one wins.
Making It in Advance
You can also prep this dish intentionally ahead of time — assemble it in the morning or the night before, and start the slow cooker later. That’s a great move if you want dinner to feel like it “just happened” at the end of a long day.
- Assemble sauce and chicken in the slow cooker insert
- Cover and refrigerate overnight
- Set it to cook the next day — just add 30 minutes to the low cook time if starting cold
If you’re prepping for a week of meals, go one step further:
Make a full batch, divide it into three meals. Serve it once with mash, once over greens, once as a sandwich or wrap. It’s the kind of dish that adapts without ever feeling like you’re eating the same thing twice.
Chicken Parmesan isn’t always thought of as meal prep food. But when it’s done in the slow cooker, with the right timing and smart storage, it becomes exactly that — reliable, reheatable, and still full of flavor on day four.
Part Eleven: Frequently Asked Questions
Because sometimes your sauce looks thin, your chicken overcooks, or you just need to know if you can throw frozen meat in and hope for the best.
Can I put frozen chicken in the slow cooker?
Technically, yes. Practically? Better not. Slow cookers heat gradually, which means frozen chicken spends too long in the temperature “danger zone” — the range where bacteria thrive before the meat reaches a safe internal temperature. It’s not worth the gamble. Thaw it in the fridge overnight and start from a level playing field. You’ll get better texture, better flavor, and safer food.
Why is my sauce watery?
The slow cooker doesn’t reduce like a pan on the stove — there’s no evaporation happening, so liquid stays put. If your sauce feels thin at the end, it’s likely from too much initial sauce or from moisture released by the chicken. Next time, start with less. You only need enough to cover the bottom and gently bathe the meat. If it’s already cooked and watery, remove the lid, crank to high, and let it simmer uncovered for 20–30 minutes to concentrate. Or transfer it to a saucepan and reduce it separately.
When should I add the cheese?
At the end — always. If you add cheese too early, it can separate, turn stringy, or melt into the sauce instead of on top of the chicken. The best moment is during the last 15–30 minutes, once the chicken is cooked through. That gives you enough heat to melt and soften the cheese without ruining the texture. If you want a bubbly, golden top, finish under the broiler for 2–3 minutes after adding cheese.
Can I use bone-in chicken?
You can — but it changes the dish. Bone-in thighs will bring more flavor and stay ultra-juicy, but you’ll need to fish out the bones before serving. Bone-in breasts are a bit trickier: they’re large, harder to portion, and cook unevenly. Boneless chicken (especially thighs) makes things cleaner and more consistent, especially for this layered, sauce-heavy format.
What’s the best cheese combo?
Low-moisture mozzarella is your anchor — it melts clean, stretches beautifully, and doesn’t add extra water. Add Parmesan for sharpness and salt, and if you want a little more tang, a slice or two of provolone never hurts. Fresh mozzarella looks great and tastes rich, but adds moisture and can get too soft unless broiled briefly at the end.
How do I keep the chicken from falling apart?
Use thick boneless breasts or large thighs, and avoid overcooking. Stick to 3.5–4 hours on low for breasts, 4–5 hours for thighs. Resist the urge to shred the meat in the pot — slow cooker dishes invite that kind of thinking, but this one is better served in full pieces, so it holds up under sauce and cheese.
Can I double the recipe?
Yes — as long as your slow cooker can handle the volume. A 6-quart model can usually fit 2.5 to 3 pounds of chicken with sauce and still cook evenly. If you’re stacking pieces, spoon a little sauce between layers to keep things moist and season both layers well. And don’t overfill — leave space for circulation, or you’ll end up with unevenly cooked chicken and sauce that never settles.
Is it supposed to look a little messy?
Yes. That’s the slow cooker’s signature. The layers won’t be perfect. The sauce may slide. The cheese might drift. But that’s part of the charm. This isn’t restaurant plating — it’s something you serve hot, by the ladle, with a piece of bread to mop up the good stuff at the bottom. Let it be a little loose around the edges. The flavor’s what you came for.
Part Twelve: Final Thoughts — A Slower Take on Something Familiar
You don’t always need to reinvent a classic. Sometimes you just need to slow it down, strip away the extra steps, and let the core of the dish do the talking.
That’s what this version of Chicken Parmesan is. It’s not about shortcuts. It’s about trade-offs — choosing depth over crispness, tenderness over speed, and comfort over precision. You don’t get the crunch of fried breadcrumbs, but you get sauce that’s been steeping for hours. You get chicken that yields to a spoon, not a knife. You get a dish that meets you at the end of a long day without asking for much in return.
It’s not the Chicken Parmesan you plate in a restaurant. It’s the one you serve at home, on a Tuesday, when you want something warm, generous, and unfussy. The kind you can portion for the week, share with family, or dress up for the table without ever turning on the stove.
And the best part? It still delivers that familiar moment — the fork cutting through soft chicken, the sauce pulling just a little, the cheese stretching as you lift your bite. The things that made the dish a classic in the first place are still right there. You’ve just taken the longer route to get to them.
And honestly? That’s where the flavor lives.